To work in parallel timelines, you can use Git branches.
Often, we need to make multiple parallel changes to files in a repository without one change affecting the others.
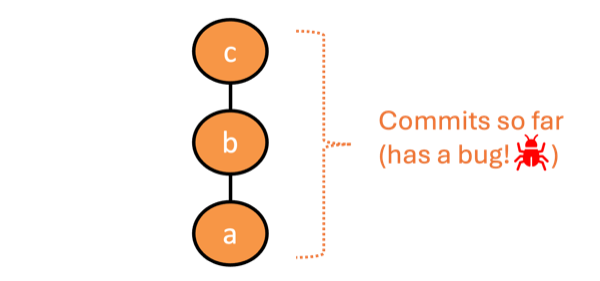
One such situation is when you want to experiment with multiple alternative fixes to a bug in parallel.
For example, suppose you notice a bug after a few commits, as shown on the left, and want to try alternative fixes.
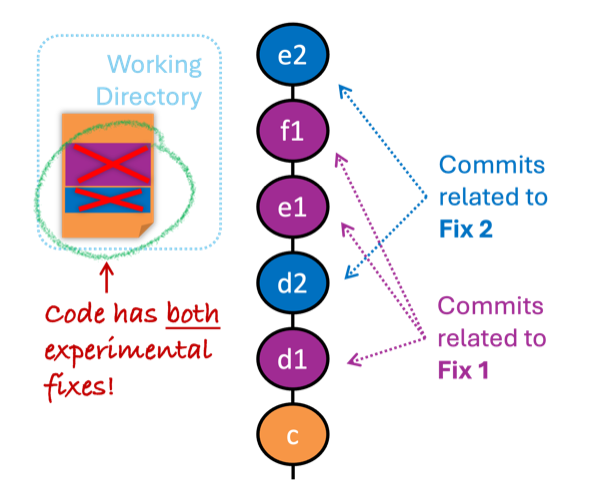
If you simply create more commits, the two fixes can mix together, interfere with each other, and get tangled with your main code.
You could copy the repository into two folders and try one fix in each. But then you would have three repositories to manage and would need to copy changes manually when choosing a fix.
Instead, we need a way to maintain multiple parallel timelines in the same repository.
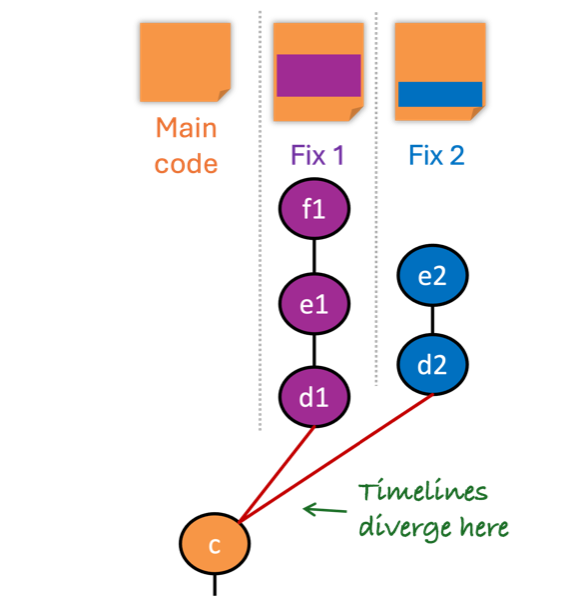
Because Git revision graphs are implemented as , they can already maintain multiple parallel timelines. For example, Git can maintain two timelines that diverge from the main timeline at commit c, one for each bug fix. You can then switch between them, compare the fixes, and choose which one to keep.
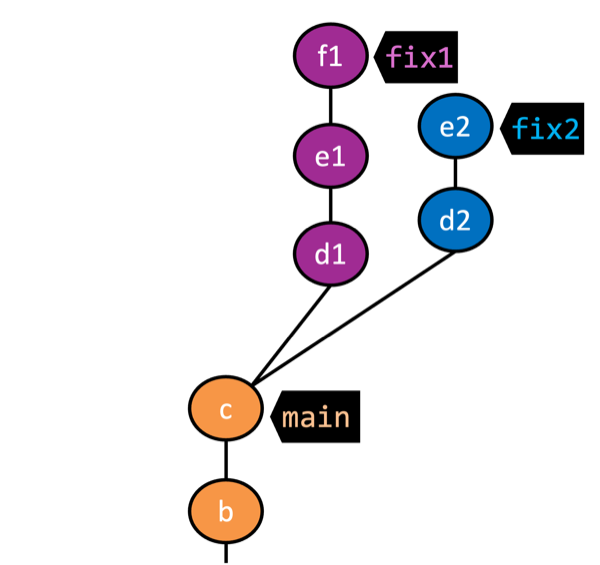
Branches let us manage diverged timelines in a practical way. A branch name points to the latest commit in a timeline, making that timeline easy to refer to.
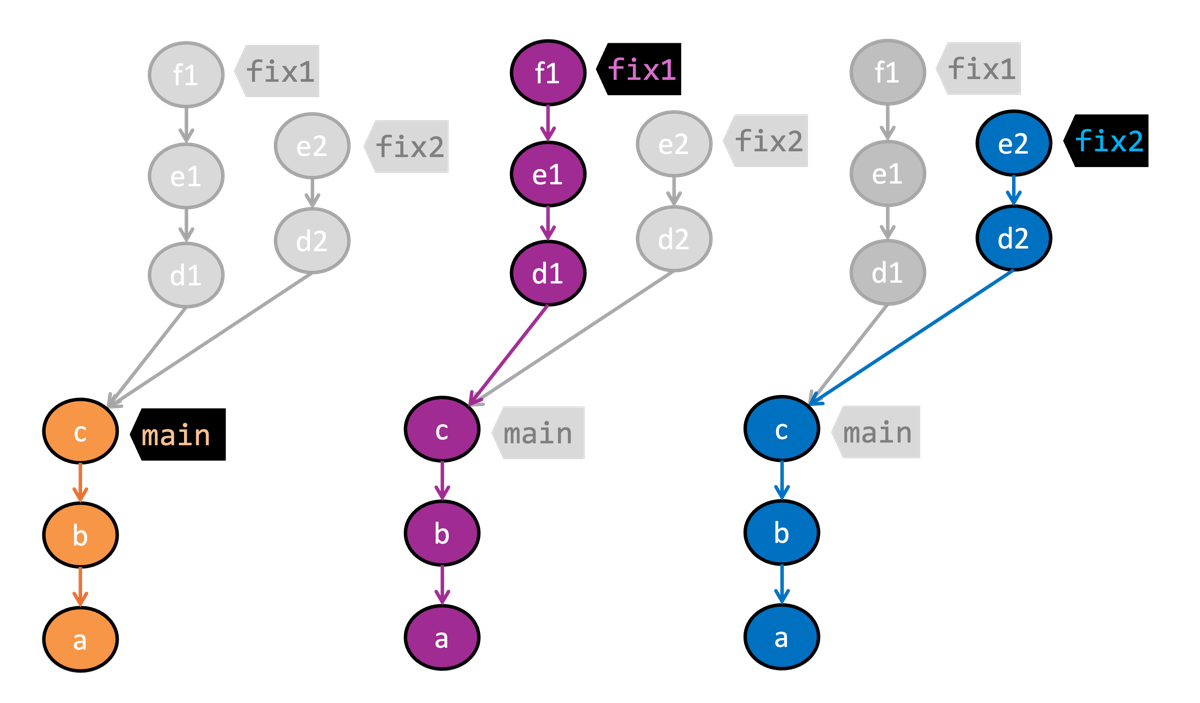
Therefore, a branch is conceptually a named timeline of commits, implemented as a label/reference (ref for short) that points to the latest commit in that timeline. In the example on the left, there are three branches: main, fix1, and fix2.
The latest commit that a points to is called the tip of the branch. For example, c is the tip of the main branch while f1 is the tip of the fix1 branch.
All commits reachable from the branch ref are considered part of the branch. Reachability follows each commit's 'parent' link. In the example below, commits c, b, and a are on main because Git can start from the ref main and traverse to those commits through parent links. Similarly, commits f1, e1, d1, c, b, and a are on fix1.
Clarification on the 'start' of a branch
We often call the point where a branch diverges from another branch the 'start' of the branch. However, technically, a branch doesn't have a start point. Since all commits reachable from a branch ref are part of the branch, the branch could be said to start at any of those commits.
In the examples above, commit c could be called the start of branches fix1 and fix2, although commits a and b are also in those branches.
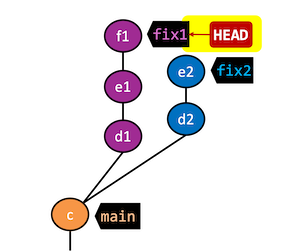
The HEAD is a special ref that points to the branch ref of the branch you are currently on, also called the current branch or the active branch. In the example on the left, fix1 is the active branch.
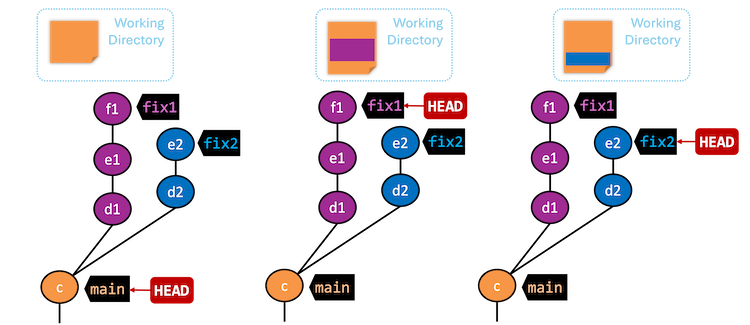
Git automatically updates the working directory to match the branch tip. As a result, changes made only in other diverged branches do not pollute it. This lets you work on one timeline in isolation.
Caveat: When switching branches, uncommitted changes may be carried across, conflict, or block the switch. More on this later.
In the example below, observe how the file in the working directory changes as we change the active branch.
Next, let us look at how branches behave as you add commits.

After you initialize a repo, Git already has a HEAD ref pointing to a branch ref. master is Git's default name for that initial branch, although you can configure another default. main is more common these days (and is the default used by Git-Mastery), so we will use it here.
At the start, you already have a branch but without any commits on it.

When you create the first commit, the main branch ref points to it, making that commit the tip of main.
The first commit of a repo doesn't have a parent commit.
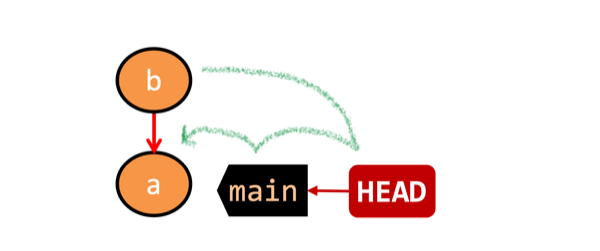
When you add a new commit, two things happen:
- First, the new commit uses the commit
HEADpoints to as its parent. Here, the new commit uses commitaas its parent.
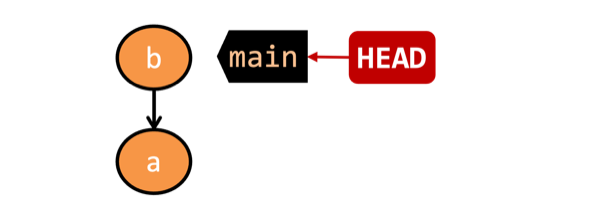
- Second, the branch ref that
HEADpoints to moves to the new commit. In this example, themainbranch ref will move to the new commitb.
TheHEADcontinues to point to the same branch ref, which means themainbranch is still the active branch.
New commits go into the branch you are currently on, and the branch ref moves to the new commit, so HEAD too points to the new commit through that branch ref.
Next, let's add branches beyond Git's initial branch.
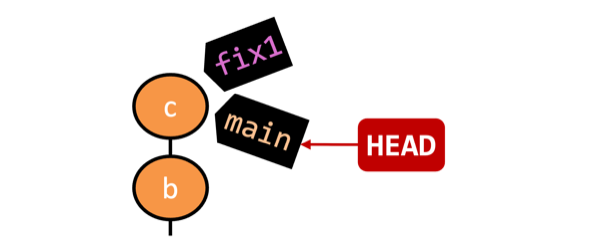
When you add a new branch, Git adds a branch ref pointing to a commit. Unless you specify another commit, it points to the tip of the current branch.
In the example on the left, the new fix1 branch ref points to the same commit as main.
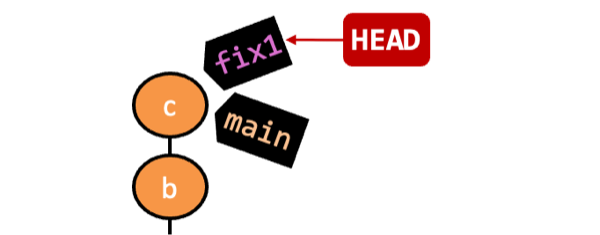
If you want subsequent commits to go into the new branch, make it active by switching to it. Then, HEAD points to the new branch ref.
In the example on the left, HEAD now points to fix1, making fix1 active.
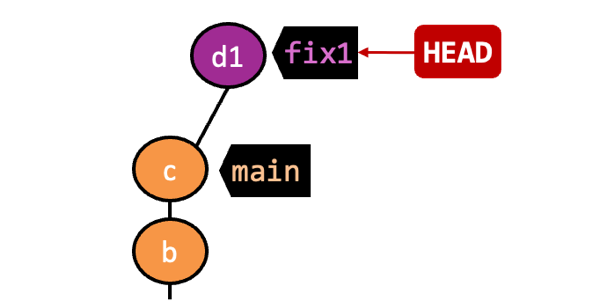
Now, a new commit d1 has been added to fix1. The fix1 ref has moved to the new commit, and HEAD points to it via the fix1 branch ref. The main branch ref remains where it is.
Revision graphs vary by Git client, so your graph's colors, positions, and orientation might not match these diagrams exactly.
Preparation
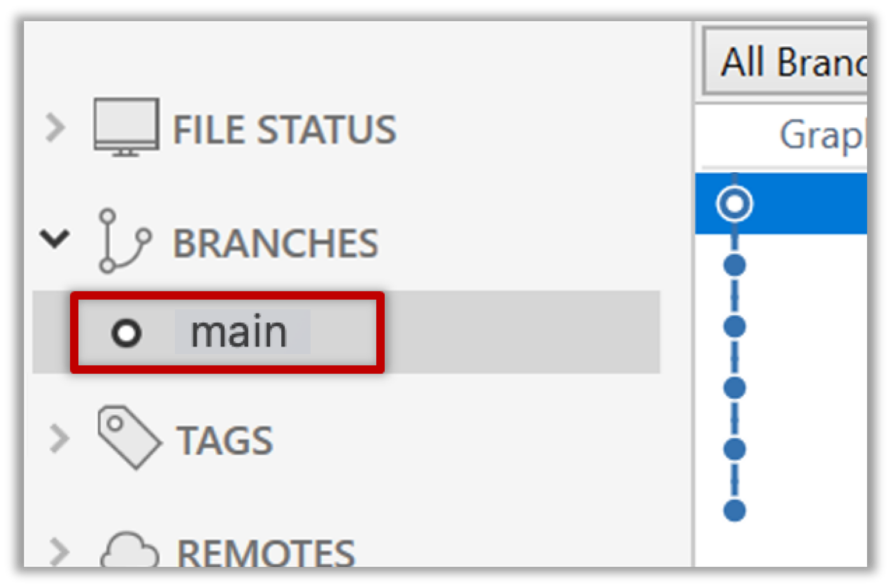
1 Observe that you are on the branch called main.
git status
On branch main
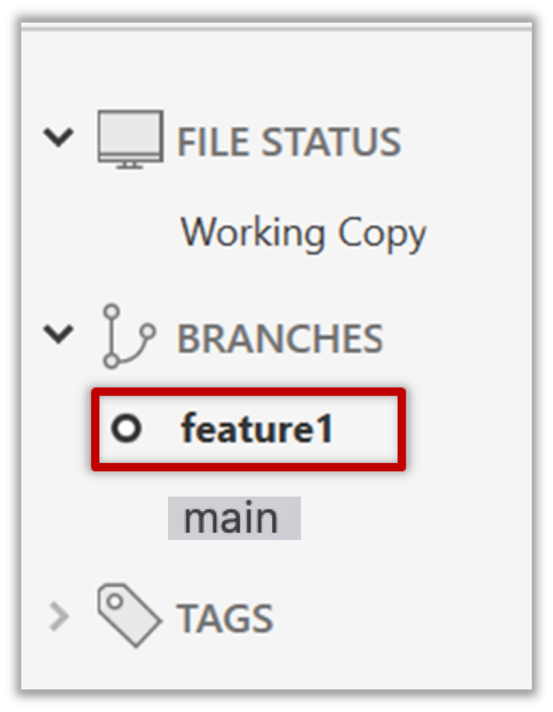
2 Start a branch named feature1 and switch to the new branch.
Use git branch to create a branch and git checkout to switch to it.
git branch feature1
git checkout feature1
Shortcut to create and switch in one step:
git checkout -b feature1
Switched to a new branch 'feature1'
The new switch command
You can use the more modern alternative git switch instead of git checkout.
To create a new branch and switch to it:
git branch feature1
git switch feature1
One-step shortcut (by using -c or --create flag):
git switch -c feature1
To list the branches in the repo, use the git branch (or the more specific git branch --list) command:
git branch
* feature1
main
The * indicates the current branch. The main branch is still there, but you are now on the feature1 branch.
Click on the Branch button on the main menu. In the next dialog, enter the branch name and click Create Branch.

Note that feature1 is now the current branch. Sourcetree switches automatically when Checkout New Branch was selected in the dialog.
3 Create some commits in the new branch, as follows.
- Add a file named
boxing.txt, stage it, and commit it.echo "Muhammad Ali" > boxing.txt git stage boxing.txt git commit -m "Add boxing.txt" - Observe how commits you add while on
feature1become part of that branch.
Observe how thefeature1ref andHEADref move to the new commit.
As before, you can use the git log --oneline --decorate command for this.
- Sourcetree sometimes represents the local repo's
HEADref as , as shown below: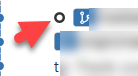
- The
HEADref is not shown in the UI if it is already pointing at the active branch.
- Add more text to
boxing.txt, stage the changes, and commit it. This commit is also added tofeature1.echo "Mike Tyson" >> boxing.txt git commit -am "Add Tyson to boxing.txt"
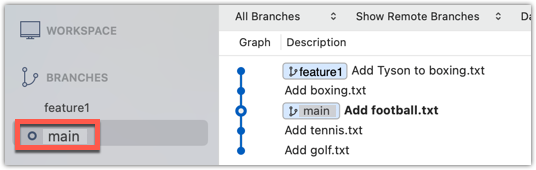
4 Switch to the main branch. Note how the changes you made in the feature1 branch are no longer in the working directory.
git switch main
Double-click the main branch.
5 Add a commit to the main branch. Let’s imagine it’s a bug fix.
To keep things simple for the time being, this commit should not involve the boxing.txt file that you changed in the feature1 branch. Of course, this is easily done, as the boxing.txt file you added in the feature1 branch is not even visible when you are in the main branch.
echo "Martina Navratilova" >> tennis.txt
git commit -am "Add Martina to tennis.txt"
gitGraph BT:
    %%{init: { 'theme': 'default', 'gitGraph': {'mainBranchName': 'main'}} }%%
    commit id: "m0"
    commit id: "m1"
    commit id: "m2"
    branch feature1
    commit id: "f1"
    commit id: "[feature1] f2"
    checkout main
    commit id: "[HEAD → main] m3"
    checkout feature1
6 Switch between the two branches and see how the working directory changes. You now have two parallel timelines that you can freely switch between.
done!
You can also start a branch from an earlier commit, not only from the latest commit in the current branch. Check out the commit you want the new branch to start from.
Preparation
Option 2: Continue with the sports repo from the previous hands-on practical
Scenario Suppose we want a branch with an alternative version of the feature1 content.
Target Create a new branch from the commit where feature1 started, as shown below:
gitGraph BT:
    %%{init: { 'theme': 'default', 'gitGraph': {'mainBranchName': 'main'}} }%%
    commit id: "m0"
    commit id: "m1"
    commit id: "m2"
    branch feature1
    branch feature1-alt
    checkout feature1
    commit id: "f1"
    commit id: "[feature1] f2"
    checkout main
    commit id: "[HEAD → main] m3"
    checkout feature1-alt
    commit id: "[HEAD → feature1-alt] a1"
Avoid this rookie mistake!
Before creating a branch, make sure you are at the commit where the new branch should start, as that is where Git will create the new branch by default.
1 Switch to the main branch.
2 Check out the commit where feature1 diverged from main (e.g., git checkout HEAD~1). This creates
a 'detached' HEAD. You are now at the commit where the new branch should diverge.
3 Create a new branch feature1-alt and switch to it (e.g., git switch -c feature1-alt). HEAD now points to this new branch and is no longer 'detached'.
PRO-TIP: Moving and creating a branch in one shot
Suppose you are on feature1 and want to create feature2 from main, then switch to it. Normally, that takes two steps:
git switch main # switch to the intended base branch first
git switch -c feature2 # create the new branch and switch to it
Use git switch -c <new-branch> <start-point> to do both in one step:
git switch -c feature2 main
Similarly, the following will create the new branch to start from one commit behind the tip of the main branch:
git switch -c feature2 main~1
4 Add a commit on the new branch. Example:
echo "Venus Williams" >> tennis.txt
git commit -am "Add Venus to tennis.txt"
done!