Most work done on branches eventually gets merged together.
Merging combines the changes from one branch into another, bringing their diverged timelines back together.
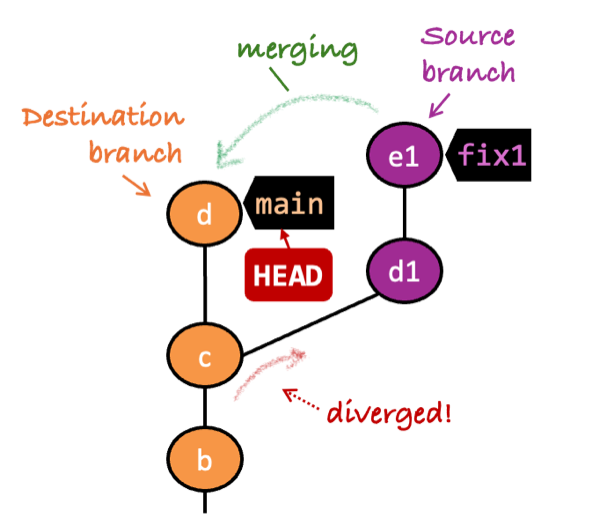
The branch you are merging into (the branch you are currently on) is called the destination branch (other terms: receiving branch, target branch).
The branch you are merging is the source branch (other terms: incoming branch, merge branch).
In our example, main is the destination branch and fix1 is the source branch.
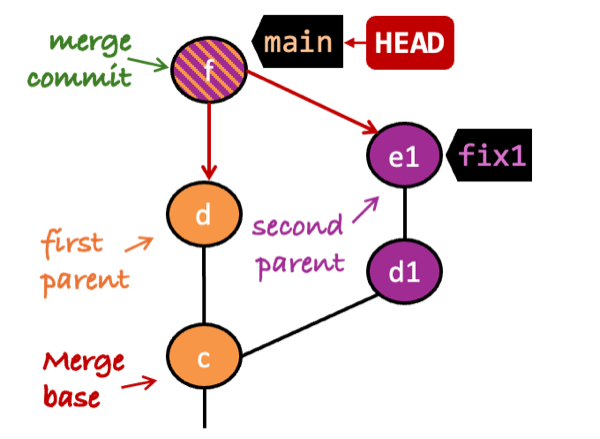
When you merge, Git compares how the two branches have diverged since their merge base (the most recent common ancestor commit). In the example on the left, commit c is their merge base.
Git then applies the source branch's changes to your current branch. Normally, this creates a new commit in the destination branch . That merge commit records the combined changes.
A typical two-branch merge commit has two parent commits. In the example above, merge commit f has both d and e as parents. The parent commit on the is the first parent, and the parent commit on the is the second parent. In our example, when fix1 is merged into main, d is the first parent and e1 is the second parent.
Merging is directional. Merging fix1 into main is not the same as merging main into fix1, as illustrated below.
fix1 into main]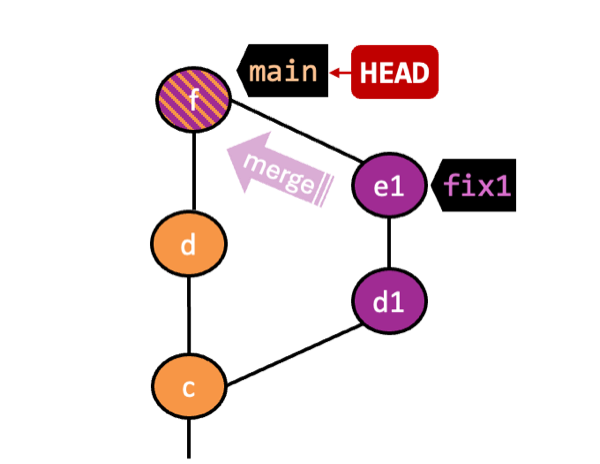
Changes made in d1 and e1 are available on main, but changes made in d are not available on fix1.
main into fix1]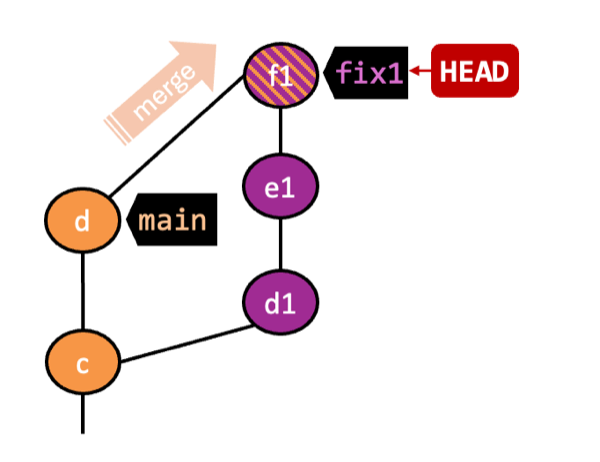
Changes made in d are available on fix1, but changes made in d1 and e1 are not available on main.
Scenario You have a repo with two unmerged branches main and feature1.
gitGraph BT:
    %%{init: { 'theme': 'default', 'gitGraph': {'mainBranchName': 'main'}} }%%
    commit id: "m0"
    commit id: "m1"
    commit id: "m2"
    branch feature1
    commit id: "f1"
    commit id: "[feature1] f2"
    checkout main
    commit id: "[HEAD → main] m3"
    checkout feature1
Target Merge each branch into the other.
Preparation
1 Switch back to the feature1 branch.
gitGraph BT:
    %%{init: { 'theme': 'default', 'gitGraph': {'mainBranchName': 'main'}} }%%
    commit id: "m1"
    commit id: "m2"
    branch feature1
    commit id: "f1"
    commit id: "[HEAD → feature1] f2"
    checkout main
    commit id: "[main] m3"
    checkout feature1
2 Merge the main branch into the feature1 branch, producing this result . Git creates a merge commit, shown as mc1 below.
gitGraph BT:
    %%{init: { 'theme': 'default', 'gitGraph': {'mainBranchName': 'main'}} }%%
    commit id: "m1"
    commit id: "m2"
    branch feature1
    commit id: "f1"
    commit id: "f2"
    checkout main
    commit id: "[main] m3"
    checkout feature1
    merge main id: "[HEAD → feature1] mc1"
git merge main
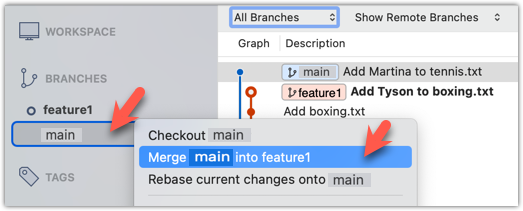
Right-click on the main branch and choose merge main into the current branch. Click OK in the next dialog.
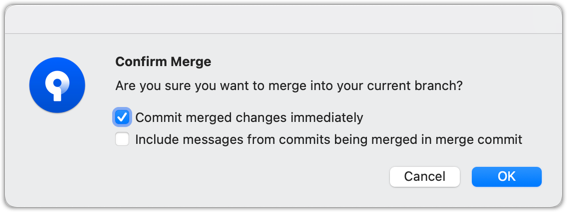
If a confirmation dialog pops up, choose as follows:
The revision graph should now look like this (colors and line alignment might vary):
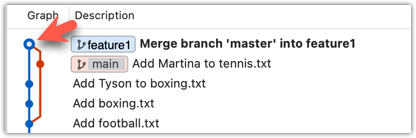
Observe that the changes from main (the imaginary bug fix in m3) are now available in feature1.
Running git diff HEAD^1 HEADExplanation of the command should show the changes from main introduced into feature1 (here, commit m3, the only new commit in main).
3 Add another commit to the feature1 branch by changing boxing.txt.
echo "Manny Pacquiao" >> boxing.txt
git commit -am "Add Manny to boxing.txt"
Switch to the main branch and add one more commit.
git switch main
echo "Lionel Messi" >> football.txt
git commit -am "Add Messi to football.txt"
gitGraph BT:
    %%{init: { 'theme': 'default', 'gitGraph': {'mainBranchName': 'main'}} }%%
    commit id: "m1"
    commit id: "m2"
    branch feature1
    commit id: "f1"
    commit id: "f2"
    checkout main
    commit id: "m3"
    checkout feature1
    merge main id: "mc1"
    commit id: "[feature1] f3"
    checkout main
    commit id: "[HEAD → main] m4"
4 Merge feature1 into the main branch, producing this result:
gitGraph BT:
    %%{init: { 'theme': 'default', 'gitGraph': {'mainBranchName': 'main'}} }%%
    commit id: "m1"
    commit id: "m2"
    branch feature1
    commit id: "f1"
    commit id: "f2"
    checkout main
    commit id: "m3"
    checkout feature1
    merge main id: "mc1"
    commit id: "[feature1] f3"
    checkout main
    commit id: "m4"
    merge feature1 id: "[HEAD → main] mc2"
git merge feature1
Right-click on the feature1 branch and choose Merge.... The resulting revision graph should look like this:
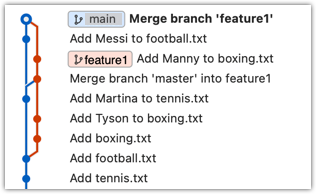
The changes you made in feature1 are now available in main.
done!
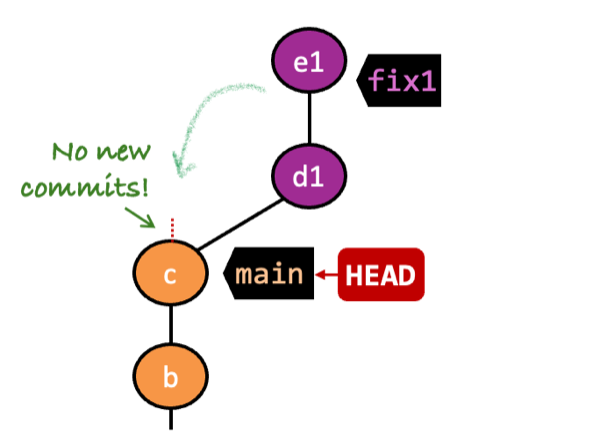
When the destination branch hasn't diverged -- meaning it has no new commits since the merge base commit -- Git can bring in the source branch's changes more directly.
In the example on the left, the main branch has not changed since the merge base commit (i.e., c).
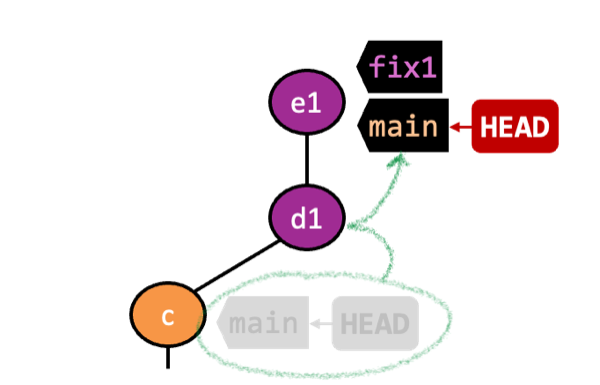
Git can merge by moving the destination branch pointer forward to include the new commits in the source branch. This is called a fast-forward merge because Git "fast-forwards" the branch ref to the tip of the other branch.
The example on the left shows how the main branch ref is moved during a fast-forward merge of the fix1 branch into the main branch.
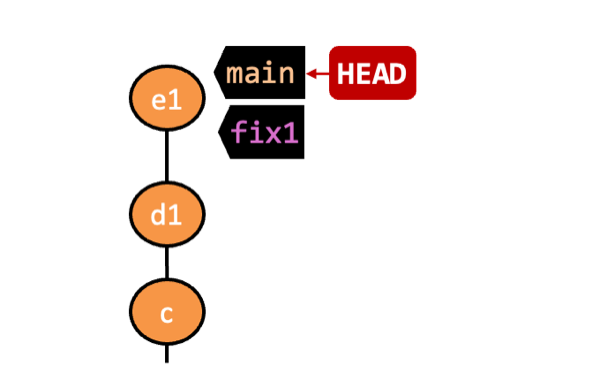
After the fast-forward merge, the revision graph looks as if all changes were made directly on main. Git no longer records where fix1 previously diverged from main.
One downside of a fast-forward merge is that the revision graph does not show when the branch was merged (as there is no merge commit). This can make the project history harder to understand.
Scenario You have a repo with an unmerged branch add-swimming. The main branch has not diverged from the add-swimming branch yet.
gitGraph BT:
    %%{init: { 'theme': 'default', 'gitGraph': {'mainBranchName': 'main'}} }%%
    commit id: "more commits ..."
    commit id: "[main] mc2"
    branch add-swimming
    commit id: "a1"
    commit id: "[HEAD → add-swimming] a2"
Target Do a fast-forward merge of the add-swimming branch into the main branch.
Preparation
Target Do a fast-forward merge of the add-swimming branch.
1 Ensure you are on the main branch.
gitGraph BT:
    %%{init: { 'theme': 'default', 'gitGraph': {'mainBranchName': 'main'}} }%%
    commit id: "more commits ..."
    commit id: "[HEAD → main] mc2"
    branch add-swimming
    commit id: "a1"
    commit id: "[add-swimming] a2"
2 Merge the add-swimming branch into the main branch. Observe that there is no merge commit: the main branch ref (and HEAD) moved to the tip of add-swimming (a2), so both branches now point to a2.
gitGraph BT:
    %%{init: { 'theme': 'default', 'gitGraph': {'mainBranchName': 'main (and add-swimming)'}} }%%
    commit id: "more commits ..."
    commit id: "mc2"
    commit id: "a1"
    commit id: "[HEAD → main][add-swimming] a2"
done!
You can force Git to create a merge commit even if fast-forwarding is possible. This keeps branch-merge points visible in the revision graph.
To prevent Git from fast-forwarding, use the --no-ff switch when merging. Example:
git merge --no-ff add-swimming
Two other useful git merge options:
--ff-only: Merge only if a fast-forward merge is possible.--ff: Prefer a fast-forward merge, but allow a merge commit if fast-forwarding is not possible. This is Git's default behavior, so the option is useful only if the default has been changed.
Select the box shown below when you merge a branch:
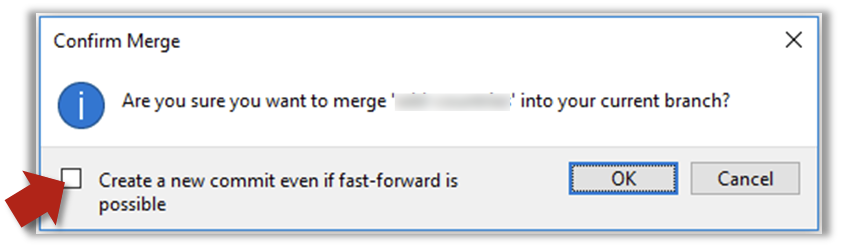
Trigger the branch operation using the following menu button:

In the next dialog, tick the following option:
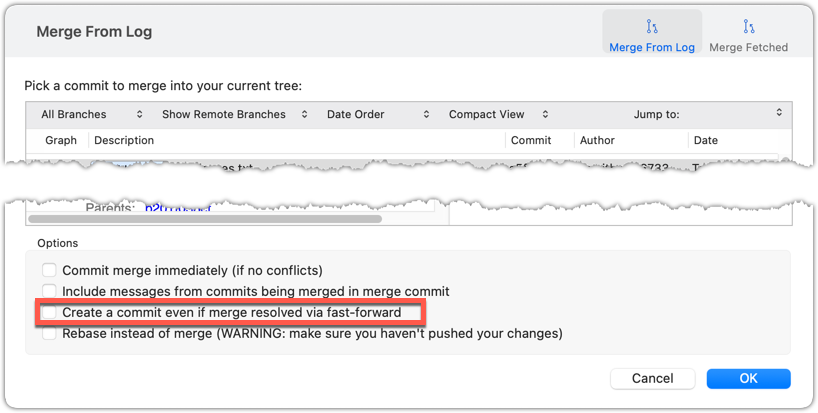
To permanently prevent fast-forwarding:
- Go to Sourcetree
Settings. - Navigate to the
Gitsection. - Select the box
Do not fast-forward when merging, always create commit.
A squash merge combines all changes from the source branch into a single commit on the destination branch. Use it when the source branch's commits would clutter history (e.g., many experimental commits).
fix1 into main]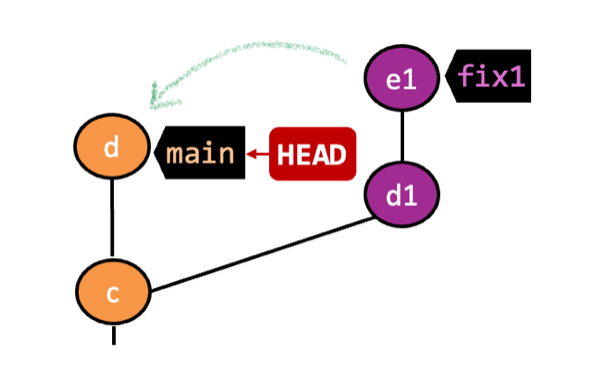
fix1 into main]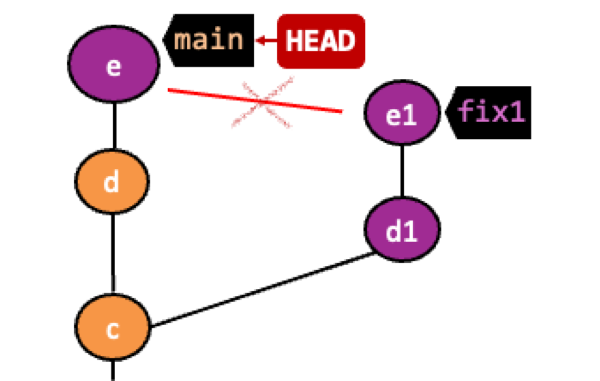
fix1]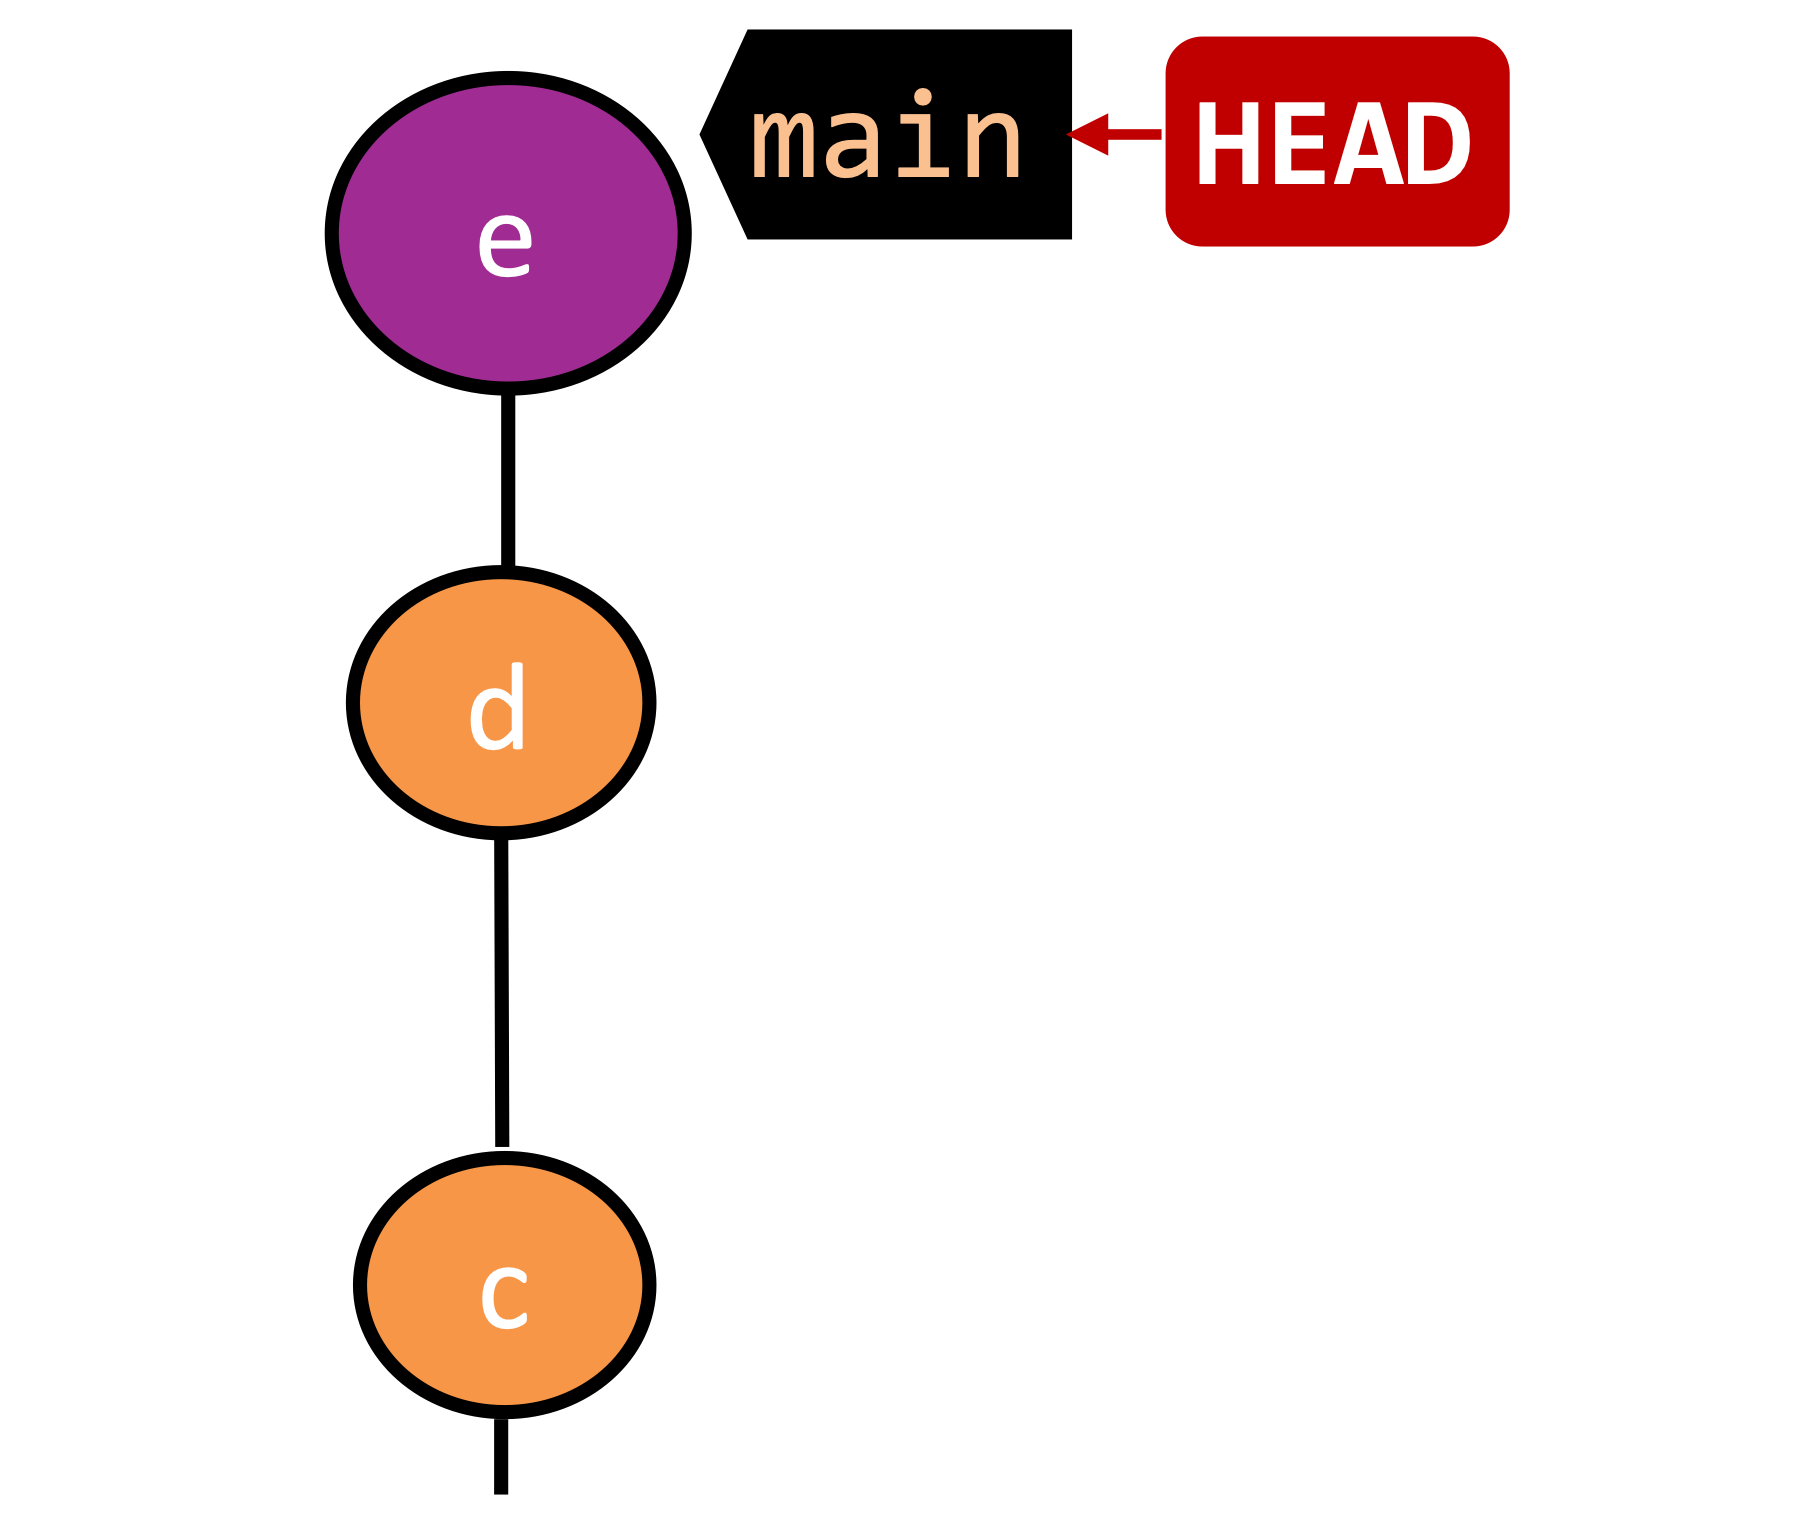
In the example above, fix1 has been squash-merged into main, creating a single 'squashed' commit e from the commits in fix1. The 'squashed' commit is a regular commit with one parent, not a merge commit with two parents.
After a squash merge, you typically delete the source branch, so its individual commits no longer appear in the repo's history (you'll learn how to delete branches in an upcoming lesson). The destination branch stays linear because one regular commit in the destination branch replaces the source branch's work, with no second-parent link to that branch from that commit.
Here is a comparison of the three merge types covered here: regular merging with a merge commit, fast-forward merging, and squash merging.
gitGraph BT:
    %%{init: { 'theme': 'default', 'gitGraph': {'mainBranchName': 'main'}} }%%
    commit id: "more commits ..."
    commit id: "[HEAD → main] m1"
    branch feature
    checkout feature
    commit id: "f1"
    commit id: "[feature] f2"
    checkout main
    merge feature
with a merge commit]
gitGraph BT:
    %%{init: { 'theme': 'default', 'gitGraph': {'mainBranchName': 'main'}} }%%
    commit id: "more commits ..."
    commit id: "m1"
    commit id: "f1"
    commit id: "[HEAD → main][feature] f2"
gitGraph BT:
    %%{init: { 'theme': 'default', 'gitGraph': {'mainBranchName': 'main'}} }%%
    commit id: "more commits ..."
    commit id: "m1"
    commit id: "[HEAD → main] s1 (same as f1+f2)"
deleting the source branch]
The detour below covers the mechanics of a squash merge.
DETOUR: Undoing a Merge
- Ensure you are in the .
- Hard-reset that branch to its , rewinding the branch to its pre-merge state.
In the example below, you merged main into feature1.
If you want to undo that merge,
- Ensure you are in the
feature1branch (because that's the destination branch). - Reset
feature1to the commit that was its tip just before you mergedmaininto it.
Use this reset-based undo only for local/unshared merges; if the merge has been pushed/shared, prefer reverting to avoid rewriting shared history.