Git-Mastery: Lessons

T1L5. Saving a Snapshot


After staging, you can save the snapshot by creating a commit.

This lesson covers that part.

Saving a snapshot of a repository is called committing, and the saved snapshot itself is called a commit.

Git constructs a commit based on the staging area. When you examine the staging area using a CLI command or a Git GUI, you are typically shown only a list of staged changes. This can mislead you into thinking that the staging area merely records changes you have selected for the commit. In reality, the staging area, which Git internally calls the index, is a complete record of the exact version of every tracked file that would be written into the next commit, not just a record of staged changes. This behavior aligns more closely with the name "index" than the name "staging area".

A Git commit is therefore a full snapshot of all tracked files. More precisely, it is a record of the exact state of all files in the staging area at that moment -- even the files that have not changed since the previous commit. This contrasts with the intuitive expectation that a commit stores only the since the previous commit. Consequently, a Git commit has all the information it needs to recreate the snapshot of the tracked files in the working directory at that point in time. In addition to the file contents, a commit also stores metadata such as the author, date, and an optional commit message describing the change.

Here is an example of how the three internal zones of Git look as a commit is followed by further changes to tracked files.

(a) Right after creating commit C1:

Project Folder
.git Folder
Committed history

C1 ← a commit

↑ ├── a snapshot of all tracked files │ ├── fruits.txt (snapshot) │ └── colours.txt (snapshot) └── other metadata about the commit
      e.g., author, date, commit message
[other Git metadata ...]
Staging area

[no changes to commit]

all tracked files ├── fruits.txt (same as C1) └── colours.txt (same as C1)
Working directory

├─ fruits.txt (tracked)
└─ colours.txt (tracked)

The staging area is empty of changes (i.e., nothing to commit), but it still contains a record of all tracked files. Tracked files in the last commit, staging area, and the working directory are identical.

(b) fruits.txt updated and staged:

Project Folder
.git Folder
Committed history

C1

↑ ├── a snapshot of all tracked files │ ├── fruits.txt (snapshot) │ └── colours.txt (snapshot) └── other metadata about the commit
      e.g., author, date, commit message
[other Git metadata ...]
Staging area

[ready to commit]

all tracked files ├── fruits.txt (some changes made) └── colours.txt (same as C1)
Working directory

├─ fruits.txt (tracked, some changes made)
└─ colours.txt (tracked)

The updated version of fruits.txt is also in the staging area. There are no changes to colours.txt in the working directory or the staging area. We can create a new commit at this point.

Given this, the staging area is not truly "empty" right after a commit; it is only empty of changes. It still contains a record of all tracked files, reflecting exactly the versions that were written into the previous commit.

A Git commit is a snapshot of all tracked files, not simply a delta of what changed since the last commit.

This is a good time to recap the three internal zones of a Git repo:

  1. Working directory The folder on your computer that contains the repo files. This is your workspace for editing files.
    Another name for this zone is working tree.
  2. Staging area (aka the index) The space that contains a copy of the exact versions of all tracked files (modified and unmodified) that will be written into the next commit. This resides inside the .git folder.
  3. Committed history Stores the commits and other metadata related to the revision history of the project. This also resides inside the .git folder.

Which area is the 'repository', exactly?
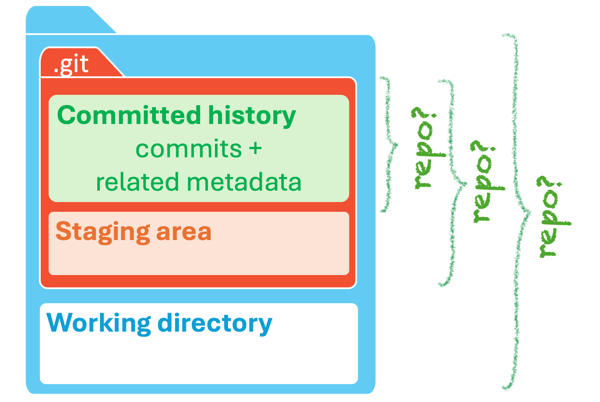
The term 'repository' generally refers to the disk area of the .git folder. However, it can sometimes also mean the 'committed history' area (which resides inside the .git folder` or even the entire project folder depending on the context.

Most Git operations are for transferring some information from one Git internal zone to another. For example, staging a file copies its current version from the working directory to the staging area, and committing saves the staged versions of all tracked files from the staging area to the commit history.

%%{init: {'sequence': {'mirrorActors': false}}}%%
sequenceDiagram
    participant WD as 📁 Working Directory
    participant SA as 📋 Staging Area
    participant CH@{ "type": "database" } as Committed History

    rect rgb(235, 245, 255)
    Note over WD,SA: Staging a file
    WD->>SA: copy current version of the file
    end

    rect rgb(235, 255, 235)
    Note over SA,CH: Committing
    SA->>CH: save staged versions of all tracked files
    end
HANDS-ON: Creating your first commit

Target To create a commit based on staged changes.

Preparation

Option 1: Create a fresh sandbox using the Git-Mastery app

  • Navigate inside the gitmastery-exercises folder.
  • Run the gitmastery download hp-first-commit command.

The sandbox will be set up inside the gitmastery-exercises/hp-first-commit folder.


Option 2: Continue with the sandbox from the previous hands-on practical

 CLI

1 First, do a sanity check using the git status command to confirm there are staged files.

git status
On branch main

No commits yet

Changes to be committed:
(use "git rm --cached <file>..." to unstage)
  new file:   fruits.txt

2 Now, create a commit using the commit command. The -m switch is used to specify the commit message.

git commit -m "Add fruits.txt"
[main (root-commit) d5f91de] Add fruits.txt
 1 file changed, 4 insertions(+)
 create mode 100644 fruits.txt

3 Verify the staging area is empty using the git status command again.

git status
On branch main
nothing to commit, working tree clean

Note how the output says nothing to commit, which means there are no staged changes to commit.

Sourcetree

1 Ensure the new file fruits.txt has been staged.
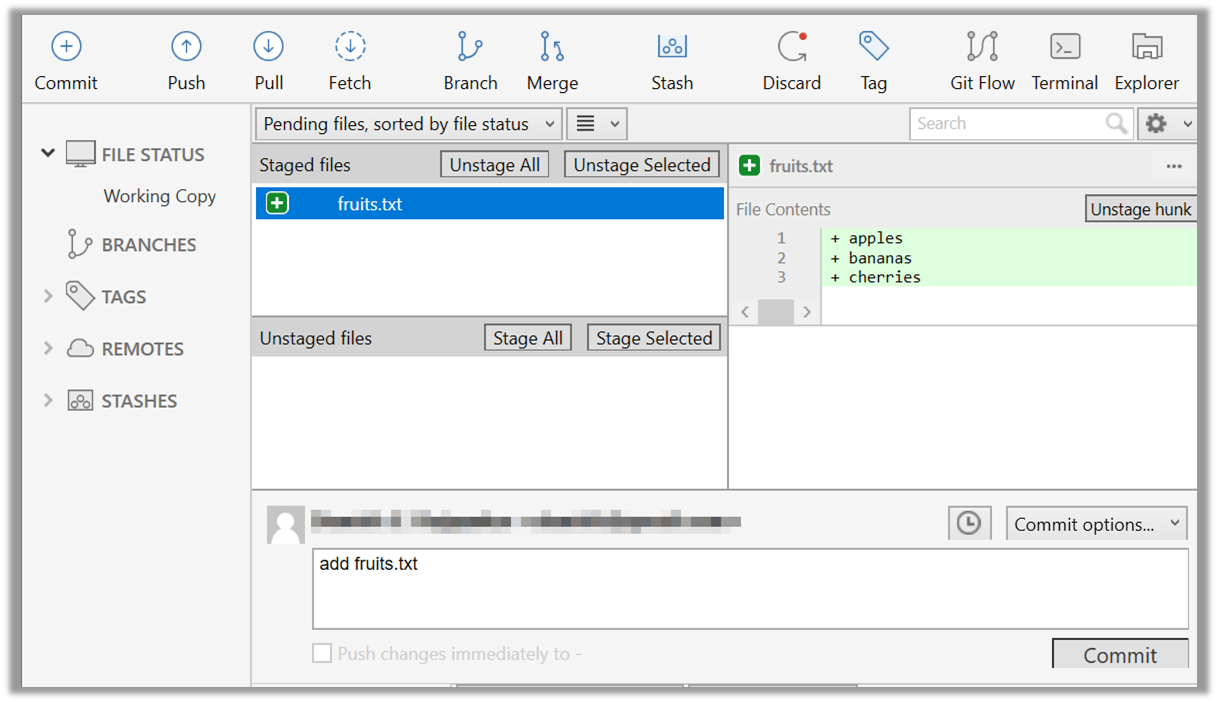
2 Click the Commit button at the top of the window.

3 Enter a commit message (e.g., add fruits.txt) into the text box.

4 Click Commit.

done!

EXERCISE: grocery-shopping

DETOUR: Staging File Deletions

When you delete a tracked file from your working directory, Git doesn't automatically assume you want that change to be part of your next commit. To tell Git you intend to record a file deletion in the repository's history, you need to stage the deletion explicitly.

When you stage a deleted file, you're adding the file's removal to the staging area, just like you'd stage a modified or newly created file. After staging, the next commit will reflect that the file was removed from the project.

Note that staging a file deletion matters only if there is at least one commit in the repository. Before any commits are made, there is no file history, so deletions have no effect on the repository.

 CLI

To delete a file and stage the deletion in one go, you can use the git rm <pathspec> command. It removes the file from the working directory and stages the deletion at the same time.

git rm data/list.txt plan.txt

If you've already deleted the file manually (for example, using rm or deleting it in your file explorer), you can still stage the deletion using the stage command (or its synonym add). Even though the file no longer exists, staging records the deletion in the staging area.

git stage data/list.txt  # same as: git add data/list.txt

Unstaging file deletions is covered in the tour Unstaging Changes given in the lesson T1L5. Saving a Snapshot.

Staging a file deletion is done similarly to staging other changes.

Sourcetree

Staging a file deletion is done similarly to staging other changes.


DETOUR: Unstaging Changes

Unstaging a staged file removes it from the staging area but keeps the changes in your working directory. This is useful if you later realize that you don't actually want to include a staged file in the next commit, perhaps because you staged it by mistake or want to include that change in a later commit.

 CLI
  • To unstage a file you added or modified, run git restore --staged <pathspec>. This command removes the file from the staging area, leaving your working directory untouched.

    git restore --staged plan.txt budget.txt data/list.txt
    

    If your repo does not have any commits yet, git restore --staged will fail with the error fatal: could not resolve HEAD.
    The remedy is to use git reset <pathspec> instead.

    git reset plan.txt
    

    In fact, git reset is an alternative way of unstaging files, and it works regardless of whether you have any commits.

    Wait. Then why does git restore --staged exist at all, if it is longer and fails in some special cases?
    Answer: It is still considered the "modern" way of unstaging files (it was introduced more recently), because it is more intuitive and purpose-specific -- whereas git reset serves multiple purposes and, if used incorrectly, can cause unintended consequences.

    The restore command can accept multiple files or paths as input, which means you can use the notation for specifying multiple files. For example, to unstage all changes you've staged, you can use git restore --staged ..

  • To unstage a file deletion (staged using git rm), use the same command as above. It will unstage the deletion and restore the file in the staging area.
    If you also deleted the file from your working directory, you may need to recover it separately with git restore <file-name(s)>.

    git restore data/list.txt data/plan.txt
    
  • To 'nuke' all changes (i.e., get rid of all staged and unstaged changes to tracked files), you can add the --worktree flag to the git restore --staged <pathspec> command.

    git restore --staged --worktree .  # nuke all changes in current folder and subfolders
    
Sourcetree

To unstage a file, locate the file in the staged files section, click the ... in front of the file, and choose Unstage file:

EXERCISE: staging-intervention


Related DETOUR: Updating the Last Commit

Git allows you to amend the most recent commit. This is useful when you realize you need to change something, such as fixing a typo in the commit message or excluding an unintended change from the commit.

That aspect is covered in the tour Updating the Last Commit given in the lesson T5L3. Reorganizing Commits.


Related DETOUR: Resetting Uncommitted Changes

At times, you might need to get rid of uncommitted changes so that you have a fresh start for the next commit.

That aspect is covered in the tour Resetting Uncommitted Changes given in the lesson T4L5. Rewriting History to Start Over.


Related DETOUR: Undoing/Deleting Recent Commits

How do you undo or delete the last few commits if you realize they were incorrect, unnecessary, or done too soon?

That aspect is covered in the tour Undoing/Deleting Recent Commits given in the lesson T4L5. Rewriting History to Start Over.