Git-Mastery: Lessons

T1L2. Preparing to Use Git


Before you start learning Git, you need to install some tools on your computer.

This lesson covers that part.

Installing Git

To use Git, you need to install Git on your computer.

PREPARATION: Install Git
Windows

Download the Git installer from the official Git website.
Run the installer and make sure to select the option to install Git Bash when prompted.

The screenshots below provide some guidance on the dialogs you might encounter when installing Git. In other cases, go with the default option.
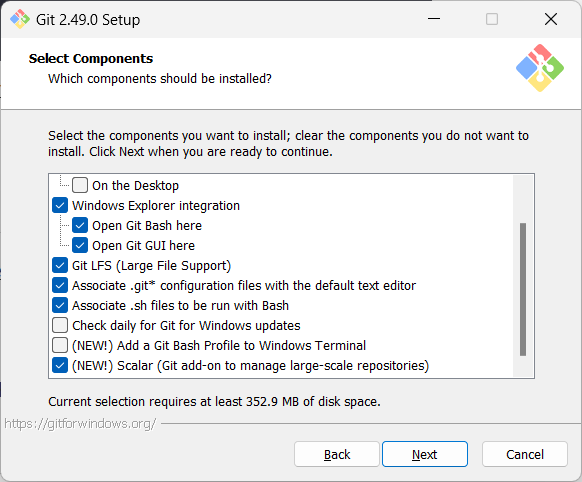
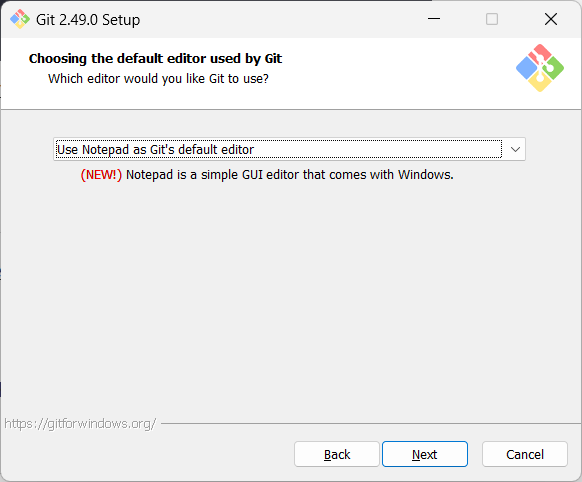
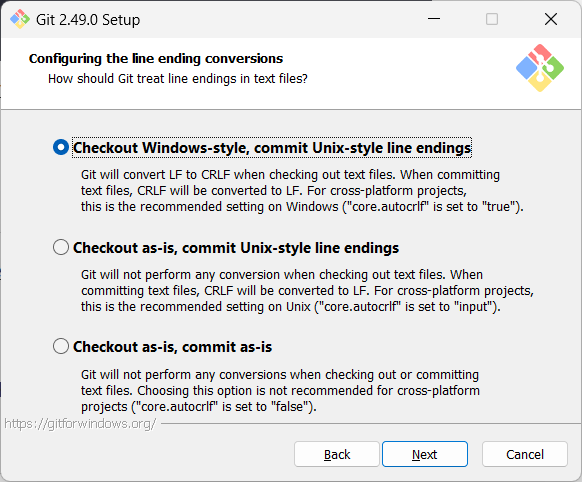
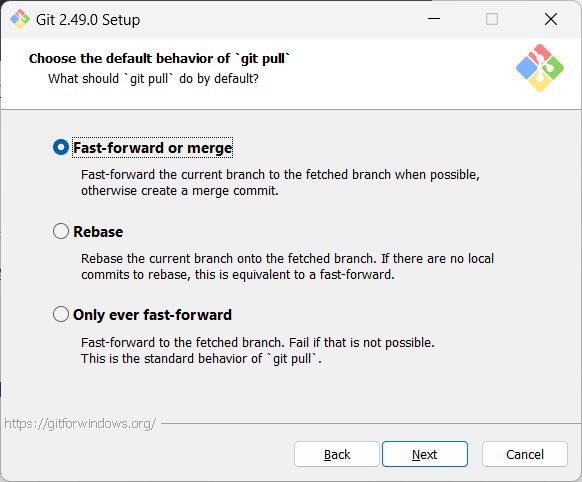
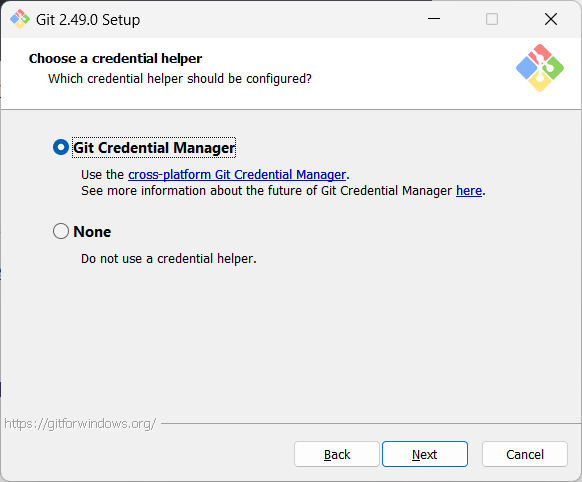

When running Git commands, Windows users should use the Git Bash terminal that comes with Git. To open the Git Bash terminal, hit the key and type git-bash. Some commands might not work in other terminals such as PowerShell.

The installation might not have added a shortcut to the Start Menu. You can navigate to the directory where git-bash.exe is (most likely C:\Program Files\Git\git-bash.exe), and double-click git-bash.exe to open Git Bash.
You can also right-click it and choose Pin to Start or Pin to taskbar.

SIDEBAR: Git Bash Terminal

Git Bash is a terminal application that lets you use Git from the command line on Windows. Since Git was originally developed for Unix-like systems (like Linux and macOS), Windows does not come with a native shell that supports all the commands and utilities commonly used with Git.

Git Bash provides a Unix-like command-line environment on Windows. It includes:

  • A Bash shell (Bash stands for Bourne Again SHell), which is a widely used command-line interpreter on Linux and macOS.
  • Common Unix tools and commands (like ls, cat, ssh, etc.) that are useful when working with Git and scripting.

When pasting text into a Git Bash terminal, you will not be able to use the familiar Ctrl+V key combo to paste. Instead, use Shift+Insert, or right-click on the terminal and use the Paste menu option.

On Windows, you might need to close and open the terminal again for it to recognize changes made elsewhere on the computer (e.g., newly installed software, changes to system variables, etc.).

macOS

Install Homebrew if you don't already have it, and then run brew install git.

Linux

Use your Linux distribution's package manager to install Git. Examples:

  • Debian/Ubuntu: run sudo apt-get update and then sudo apt-get install git.
  • Fedora: run sudo dnf update and then sudo dnf install git.

Verify Git is installed by running the following command in a terminal.

git --version
git version 2._._

The output should display the version number.


Configuring user.name and user.email

Git needs to know who you are to record changes properly. When you save a snapshot of your work in Git, it records your name and email as the author of that change. This ensures everyone working on the project can see who made which changes. Accordingly, you should set the config settings user.name and user.email before you start using Git for revision control.

PREPARATION: Set user.name and user.email

To set the two config settings, run the following commands in your terminal window:

git config --global user.name "<your-name>"
git config --global user.email "<your-email@example.com>"

Example:

git config --global user.name "John Doe"
git config --global user.email "john.doe@example.com"

To check whether they are set as intended, you can use the following two commands:

git config --global user.name
git config --global user.email

Configuring init.defaultBranch

Git has a config property named init.defaultBranch that specifies the default branch name for new repositories (you'll learn more about Git branches in later lessons). Git uses master as the default value, but main is more common now. Git-Mastery uses main too. To make Git behave more consistently with our lessons, you should set this property to main, as described in the panel below:

PREPARATION: Set init.defaultBranch to main

To set the init.defaultBranch config property to main, run the following command in your terminal window:

git config --global init.defaultBranch main

To verify, run the following command:

git config --global init.defaultBranch
main

If you want to set this property back to master later, use git config --global init.defaultBranch master.


Interacting with Git: CLI vs GUI

Git is fundamentally a command-line tool. You primarily interact with it by typing commands in its . This gives you full control over its features and helps you understand what's really happening under the hood.

clients for Git also exist, such as Sourcetree, GitKraken, and the built-in Git support in editors like IntelliJ IDEA and VS Code. These tools provide a more visual way to perform some Git operations.

If you're new to Git, it's best to learn the CLI first. The CLI is universal, always available (even on servers), and helps you build a solid understanding of Git's concepts. You can use GUI clients as a supplement -- for example, to visualize complex history structures.

Mastering the CLI gives you confidence and flexibility, while GUI tools can serve as helpful companions.

PREPARATION: [Optional] Install a GUI client

Optionally, you can install a Git GUI client, such as Sourcetree (installation instructions).

Our Git lessons show how to perform Git operations using Git CLI and Sourcetree; Sourcetree is included only to illustrate how Git GUIs work. It is perfectly fine for you to learn the CLI only.
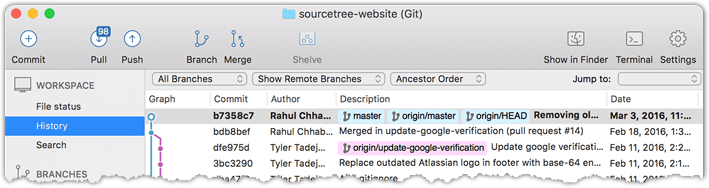

[image credit: https://www.sourcetreeapp.com]


Installing the Git-Mastery App

In these lessons, we will use Git-Mastery, a companion app we developed to help Git learners. In particular, it provides exercises that let you self-test your Git knowledge, and it verifies whether your solution is correct.

If you are new to Git, we strongly recommend that you install and use the Git-Mastery app.

1. Install the Git-Mastery App

Windows
  • Download the gitmastery.exe file from the latest release.
    Put it in a suitable location (ensure the file name remains gitmastery.exe).

    Do not run the gitmastery.exe file directly! If you do, it will only flash a terminal briefly and disappear.
    Reason: Git-Mastery is a app that you activate by issuing a command via a terminal, not running the executable directly (e.g., by double-clicking the file). More on how to use CLI apps on Windows

  • Add the folder containing gitmastery.exe to your Windows PATH system variable by following this guide.
    E.g., if the file location is C:\Users\Jane\Tools\gitmastery.exe, you should add C:\Users\Jane\Tools to your PATH.

  • Close and reopen the Git Bash terminal (for the updated PATH to take effect).

Windows Defender says gitmastery.exe is a virus?

In some cases, Windows Defender can incorrectly flag gitmastery.exe as a virus. The Git-Mastery team is working on getting the app allowlisted. In the meantime, it is safe to override the warning or block by choosing the Run anyway option (if given) or using the following steps.

  1. Open Windows SecurityVirus & threat protection.
  2. Click Protection history.
  3. Find the blocked gitmastery.exe and click it.
  4. Choose ActionsAllow on device (or Restore).
    After this step, you may need to re-download the file if it was removed previously.

Alternatively, refer to this page to see how to exclude a file from Windows virus scanner (look for the section named 'Exclusions').


macOS
brew tap git-mastery/gitmastery
brew install gitmastery
Linux

Ensure you are running libc version 2.38 or newer (you can use the ldd --version command to check the current version).

Then install the app by running the following commands:

echo "deb [trusted=yes] https://git-mastery.github.io/gitmastery-apt-repo any main" | \
  sudo tee /etc/apt/sources.list.d/gitmastery.list > /dev/null
sudo apt install software-properties-common
sudo add-apt-repository "deb https://git-mastery.github.io/gitmastery-apt-repo any main"
sudo apt update
sudo apt-get install gitmastery

Use an AUR helper to install gitmastery-bin. For example, use yay:

yay -S gitmastery-bin

Alternatively, you can build the PKGBUILD yourself following the instructions on the Arch wiki.


If you are using a Linux distribution that is not yet supported by Git-Mastery, please download the correct binary for your architecture from the latest release.

Install it to /usr/bin to access the binary. The following example uses version 3.3.0.

install -D -m 0755 gitmastery-3.3.0-linux-arm64 /usr/bin/gitmastery

2. To verify the installation, open a terminal, and run the gitmastery --help command from two different folders. Here is an example (IMPORTANT: change the cd command to match your folders):

gitmastery --help
cd ../my-projects  # navigate to a different folder
gitmastery --help

Explanation of cd ../my-projects command

The current version of the app takes about 3 to 5 seconds to respond to a command because it comes with a bundled Python runtime (so users don't need to install Python first) that must load before the command can be executed.

3. In a terminal, navigate to a suitable folder where you want Git-Mastery to place the files and folders it creates.

Do not use a folder controlled by OneDrive, Dropbox, GDrive, etc. for this! Git, and by extension Git-Mastery, can run into problems if Git repositories are placed inside folders controlled by file sync software such as OneDrive, Dropbox, GDrive, etc. 🤔 Why?

Example:

mkdir gitmastery-home
cd gitmastery-home

Explanation of mkdir gitmastery-home command

4. Trigger the initial setup by running the gitmastery setup command in that terminal.

gitmastery setup

The gitmastery setup command will perform the following tasks:

  • Verify that Git is installed.
  • Verify that user.name and user.email are set.
  • Prompt you to specify a name for the git-mastery exercises directory (sometimes called the git-mastery root directory).
    • Recommended: accept the default (i.e., gitmastery-exercises) by pressing Enter.
    • If you choose to specify a different name for that folder, remember to use that name instead whenever our instructions refer to the gitmastery-exercises folder.
    • Caution: do not rename or move this folder later, as doing so can affect the app's functionality.
  • Set up a mechanism to locally track the progress of your exercises.

Notes:

  • If the command fails because check (a) or (b) failed, fix the problem and run the command again.
  • If you want to check the Git setup again later, run the gitmastery check git command.

Git-Mastery App: Commands
Command Run from ... What it does
gitmastery --help anywhere Prints a brief message on how to use the app.
gitmastery <command> --help anywhere Prints a brief explanation of the <command>.
e.g., gitmastery download --help
gitmastery version anywhere Gets the current version of the Git-Mastery app on your machine.
gitmastery setup anywhere Sets up Git-Mastery for your local machine.
gitmastery check git anywhere Verifies that you have set up Git for Git-Mastery.
gitmastery check github anywhere Verifies that you have set up GitHub and GitHub CLI for Git-Mastery.
gitmastery download <exercise name> git-mastery root Sets up the sandbox for the specified exercise.
gitmastery download <hands-on-practical name> git-mastery root Sets up the specified hands-on practical on your computer.
gitmastery verify inside exercise Verifies your exercise attempt. Saves the progress made.
gitmastery progress reset exercise root Resets the progress of the current exercise.
gitmastery progress show git-mastery root Shows a summary of your exercise progress.
gitmastery progress sync on git-mastery root Enables remote progress tracking of exercises.
gitmastery progress sync off git-mastery root Disables remote progress tracking of exercises.

Explanation of 'Run from ...' options:

  • git-mastery root: Run the command from the directory where Git-Mastery exercises are located, aka the exercises directory (default folder name: gitmastery-exercises).
  • exercise root: Run the command in the sandbox folder containing the exercise.
  • inside exercise: Run the command from the sandbox folder containing the exercise, or any subfolder of it.

Updating the Git-Mastery App

Because the Git-Mastery app is under active development, it is likely to get updated frequently. When you run a gitmastery <command>, the output will warn you if there is a new version; update the app immediately by following the instructions in that message.

Windows

Replace your current gitmastery.exe with the latest version from the latest release and restart your terminal.

macOS
brew update
brew upgrade gitmastery
Linux
sudo apt-get update
sudo apt-get install --only-upgrade gitmastery

sudo pacman -S gitmastery-bin