A branch-based forking workflow is common in open-source projects and other large projects.
In a branch-based forking workflow, the official code lives in a designated 'main' repo, while each developer works in their own fork (hence, the name) and submits pull requests from separate branches (either long-lived branches or short-term branches) back to the main repo. That is, it is a combination of the forking model and the feature-branch strategy. Not only is this workflow common for OSS projects and other large-team projects, it provides a good foundation for learning Git workflows (because other workflows are simpler than this, once you learn this workflow, it is easy to move to other workflows).
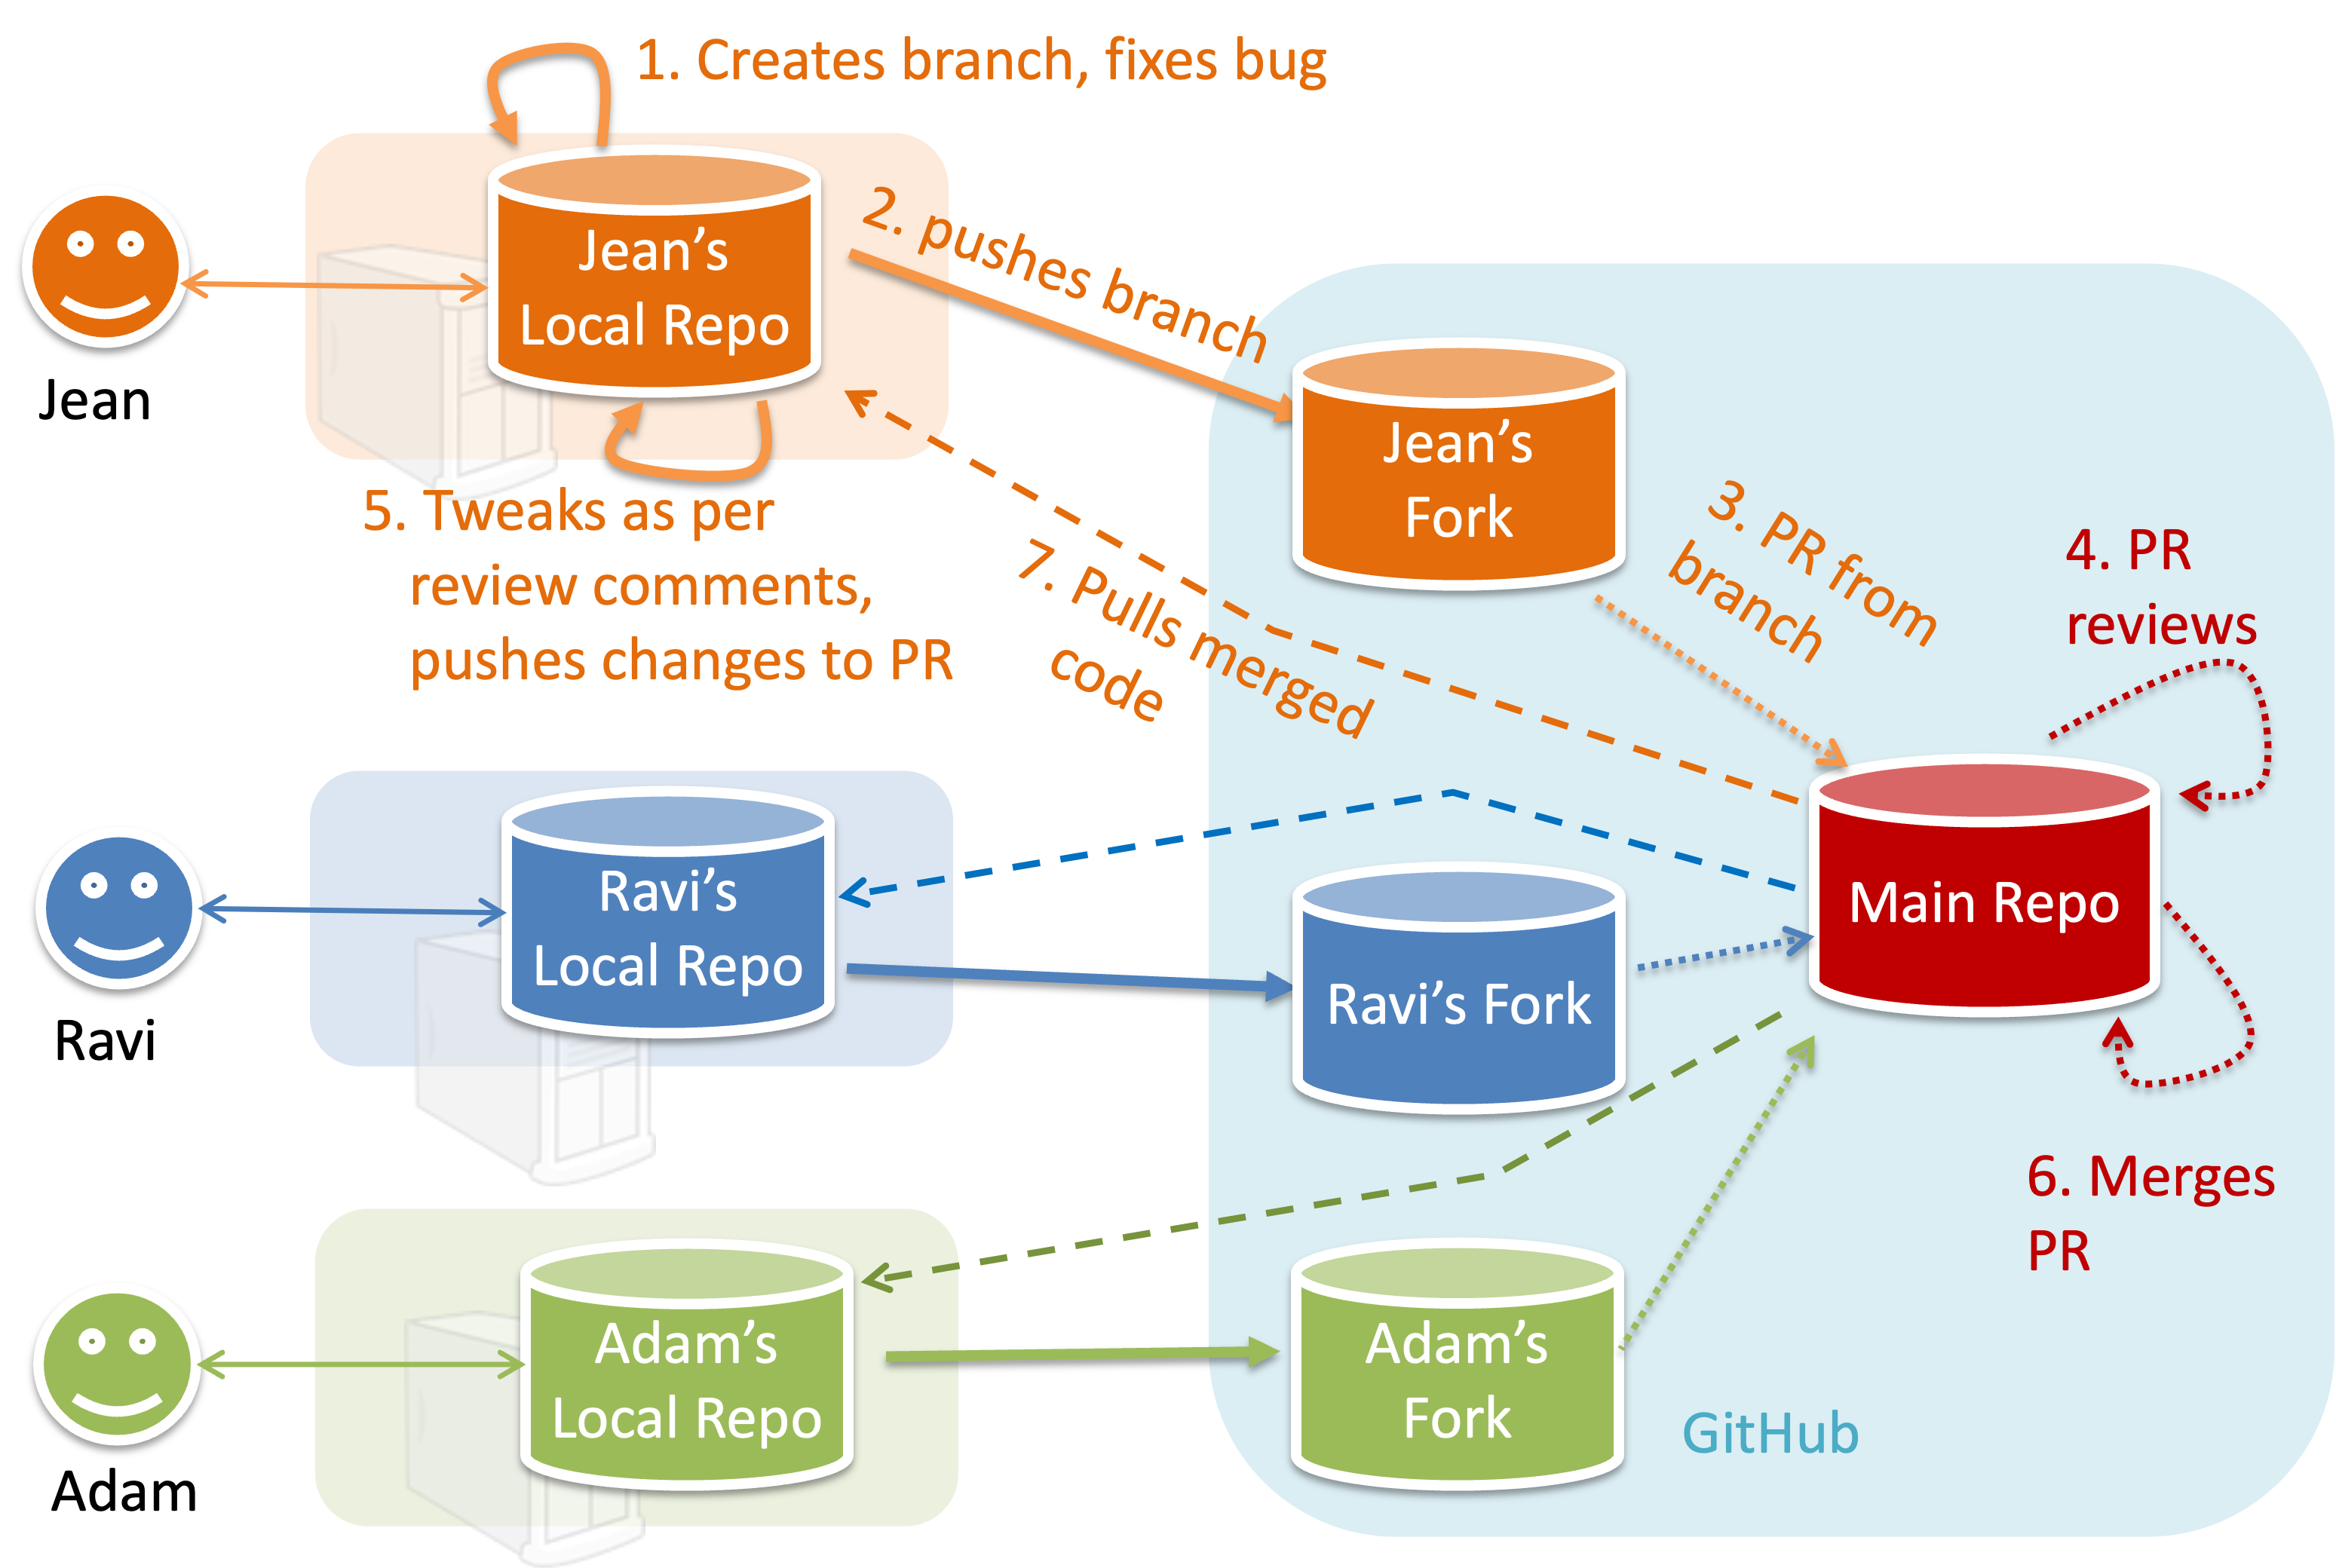
To illustrate how the workflow goes, let’s assume Jean wants to fix a bug in the code. Here are the steps:
- Jean creates a separate branch in her local repo and fixes the bug in that branch.
Common mistake: Doing the proposed changes in themainbranch -- if Jean does that, she will not be able to have more than one PR open at any time because any changes to themainbranch will be reflected in all open PRs. - Jean pushes the branch to her fork.
- Jean creates a pull request from that branch in her fork to the main repo.
- Other members review Jean’s pull request.
- If reviewers suggested any changes, Jean updates the PR accordingly.
- When reviewers are satisfied with the PR, one of the members (usually the team lead or a designated 'maintainer' of the main repo) merges the PR, which brings Jean’s code to the main repo.
- Other members (and Jean), realizing there is new code in the upstream repo, sync their forks with the new upstream repo (i.e., the main repo). This is done by pulling the new code to their own local repo and pushing the updated code to their own fork. If there are unmerged branches in the local repo, they can be updated too e.g., by merging the new
mainbranch to each of them.
Potential mistake: Creating another 'reverse' PR from the team repo to the team member's fork to sync the member's fork with the merged code. PRs are meant to go from downstream repos to upstream repos, not in the other direction.
One main benefit of this workflow is that it does not require most contributors to have write permissions to the main repository. Only those who are merging PRs need write permissions. The main drawback of this workflow is the extra overhead of sending everything through forks.
This practical is best done as a team.
Preparation One member: set up the team org and the team repo.
Create a GitHub organization for your team, if you don't have one already. The org name is up to you. We'll refer to this organization as team org from now on.
Add a team called
developersto your team org.Add team members to the
developersteam.Fork git-mastery/samplerepo-workflow-practice to your team org. We'll refer to this as the team repo.
Add the forked repo to the
developersteam. Give write access.
1 Each team member: create PRs via own fork.
Fork that repo from your team org to your own GitHub account.
Create a branch named
add-{your name}-info(e.g.add-johnTan-info) in the local repo.Add a file
yourName.mdinto themembersdirectory (e.g.,members/johnTan.md) containing some info about you into that branch.Push that branch to your fork.
Create a PR from that branch to the
mainbranch of the team repo.
2 For each PR: review, update, and merge.
[A team member (not the PR author)] Review the PR by adding comments (can be just dummy comments).
[PR author] Update the PR by pushing more commits to it, to simulate updating the PR based on review comments.
[Another team member] Approve and merge the PR using the GitHub interface.
[All members] Sync your local repo (and your fork) with upstream repo. In this case, your upstream repo is the repo in your team org.
- The basic mechanism for this has two steps (which you can do using Git CLI or any Git GUI):
(1) First, pull from the upstream repo -- this will update your clone with the latest code from the upstream repo.
If there are any unmerged branches in your local repo, you can update them too e.g., you can merge the newmainbranch to each of them.
(2) Then, push the updated branches to your fork. This will also update any PRs from your fork to the upstream repo. - Some alternative mechanisms to achieve the same can be found in this GitHub help page.
If you are new to Git, we recommend that you use the two-step mechanism above instead, so you get a clearer view of what is happening behind the scenes.
- The basic mechanism for this has two steps (which you can do using Git CLI or any Git GUI):
3 Create conflicting PRs.
[One member]: Update README: In the
mainbranch, remove John Doe and Jane Doe from theREADME.md, commit, and push to the main repo.[Each team member] Create a PR to add yourself under the
Team Memberssection in theREADME.md. Use a new branch for the PR e.g.,add-johnTan-name.
4 Merge conflicting PRs one at a time. Before merging a PR, you’ll have to resolve conflicts.
[Optional] A member can inform the PR author (by posting a comment) that there is a conflict in the PR.
[PR author] Resolve the conflict locally:
- Pull the
mainbranch from the repo in your team org. - Merge the pulled
mainbranch to your PR branch. - Resolve the merge conflict that crops up during the merge.
- Push the updated PR branch to your fork.
- Pull the
[Another member or the PR author]: Merge the de-conflicted PR: When GitHub does not indicate a conflict anymore, you can go ahead and merge the PR.
done!