Target Usage: To make use of multiple timelines of work in a local repository.
Motivation: At times, you need to do multiple parallel changes to files (e.g., to try two alternative implementations of the same feature).
Lesson plan:
T6L1. Creating Branches covers that part.
T6L2. Merging Branches covers that part.
T6L3. Resolving Merge Conflicts covers that part.
T6L4. Renaming Branches covers that part.
T6L5. Deleting Branches covers that part.
To work in parallel timelines, you can use Git branches.
Git branches let you develop multiple versions of your work in parallel — effectively creating diverged timelines of your repository’s history. For example, one team member can create a new branch to experiment with a change, while the rest of the team continues working on another branch. Branches can have meaningful names, such as main, release, or draft.
A Git branch is simply a ref (a named label) that points to a commit and automatically moves forward as you add new commits to that branch. As you’ve seen before, the HEAD ref indicates which branch you’re currently working on, by pointing to the corresponding branch ref.
When you add a commit, it goes into the branch you are currently on, and the branch ref moves to the new commit, effectively making the HEAD ref point to the new commit as well (via the branch ref).
Git creates a branch named master by default (Git can be configured to use a different name e.g., main -- which is the more common choice these days, and is the default used by Git-Mastery).
Given below is an illustration of how branch refs move as branches evolve. Refer to the text below it for explanations of each stage.
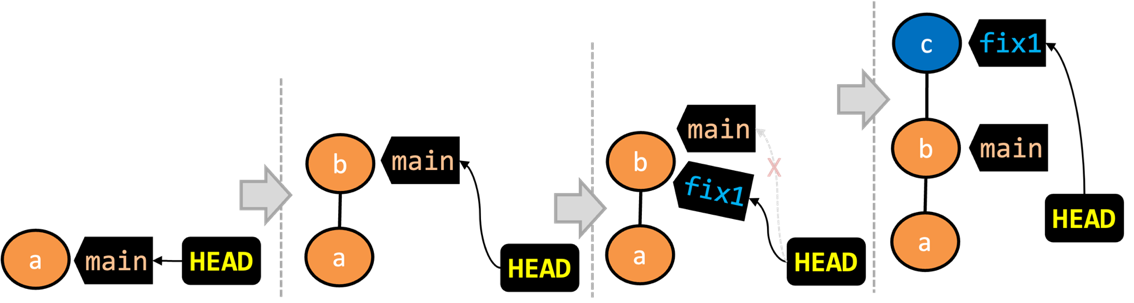
- There is only one branch (i.e.,
main) and there is only one commit on it. TheHEADref is pointing to themainbranch (as we are currently on that branch). - A new commit has been added. The
mainhas moved to the new commit.HEADcontinues to be attached to themainref, thus pointing to the new commit as well. - A new branch
fix1has been added. The repo has switched to the new branch too (hence, theHEADref is now attached to thefix1branch). - A new commit (
c) has been added. The current branch reffix1has moved to the new commit.HEADis also pointing to the new commit, as it remains attached to thefix1branch ref.
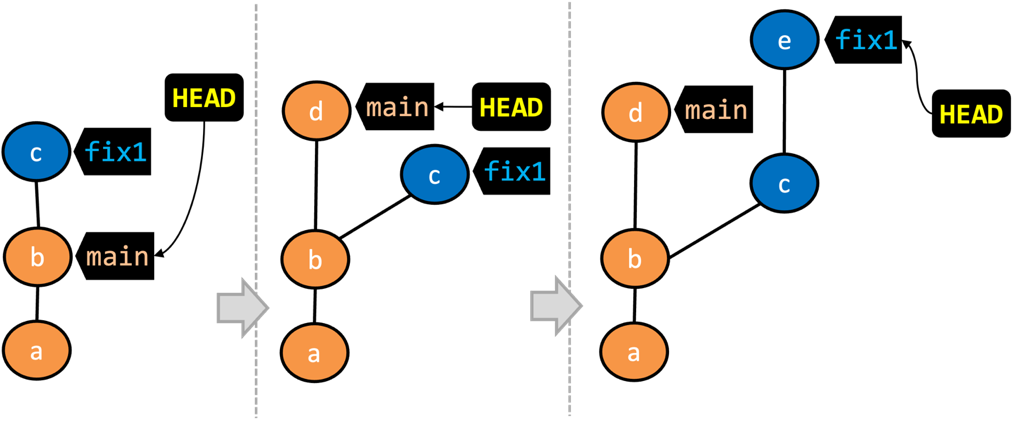
- The repo has switched back to the
mainbranch. Hence, theHEADis now pointing to themainbranch ref, and via that, to commitbthat is at the of that branch.
As a result, the repo's working directory now reflects the code at commitb(notc). - A new commit (
d) has been added. Themainand theHEADrefs now point to that commit. - The repo has switched back to the
fix1branch and added a new commiteto it. The branch reffix1(together withHEAD) are now pointing to the new commitewhile the branch refmainstill points tod.
Appearance of the revision graph (colors, positioning, orientation etc.) varies based on the Git client you use, and might not match the exact diagrams given above.
Preparation
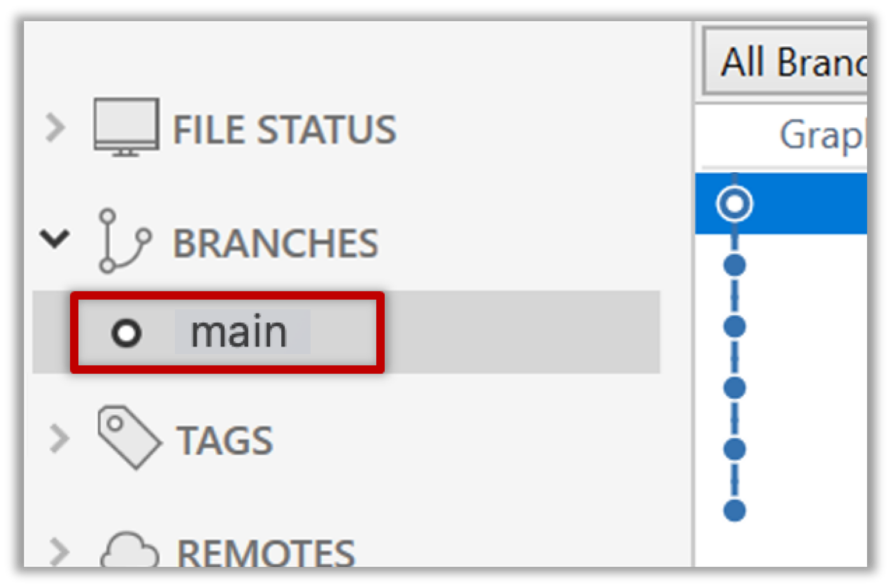
1 Observe that you are on the branch called main.
git status
On branch main
2 Start a branch named feature1 and switch to the new branch.
You can use the branch command to create a new branch and the checkout command to switch to a specific branch.
git branch feature1
git checkout feature1
One-step shortcut to create a branch and switch to it at the same time:
git checkout -b feature1
Switched to a new branch 'feature1'
The new switch command
Git recently introduced a switch command that you can use instead of the checkout command given above.
To create a new branch and switch to it:
git branch feature1
git switch feature1
One-step shortcut (by using -c or --create flag):
git switch -c feature1
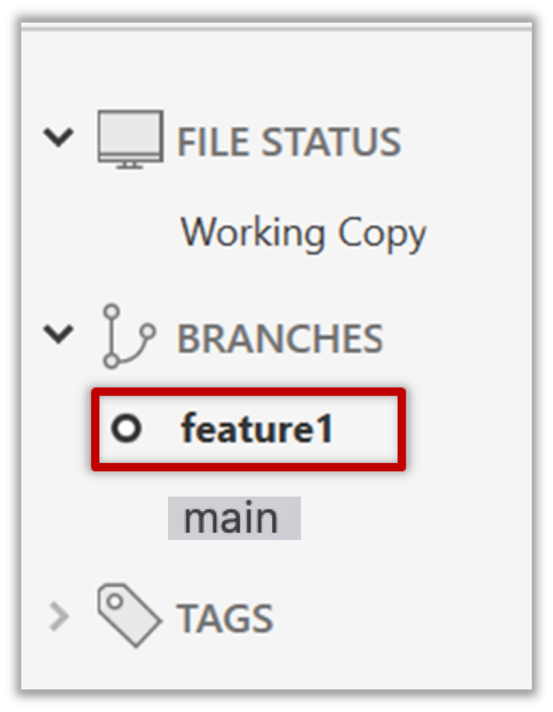
Click on the Branch button on the main menu. In the next dialog, enter the branch name and click Create Branch.

Note how the feature1 is indicated as the current branch (reason: Sourcetree automatically switches to the new branch when you create a new branch, if the Checkout New Branch was selected in the previous dialog).
3 Create some commits in the new branch, as follows.
- Add a file named
boxing.txt, stage it, commit it.echo -e "Muhammad Ali" > boxing.txt git stage boxing.txt git commit -m "Add boxing.txt" - Observe how commits you add while on
feature1branch will becomes part of that branch.
Observe how thefeature1ref and theHEADref move to the new commit.
As before, you can use the git log --oneline --decorate command for this.
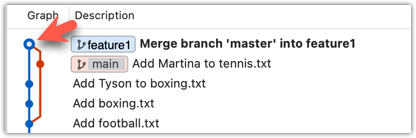
- At times, the
HEADref of the local repo is represented as in Sourcetree, as illustrated in the screenshot below .
. - The
HEADref is not shown in the UI if it is already pointing at the active branch.
- Add some more texts to
boxing.txt, stage the changes, and commit it. This commit too will be added to thefeature1branch.echo -e "Mike Tyson" >> boxing.txt git commit -am "Add Tyson to boxing.txt"
4 Switch to the main branch. Note how the changes you made in the feature1 branch are no longer in the working directory.
git switch main
Double-click the main branch.
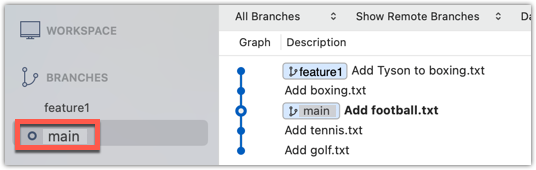
Revisiting main vs origin/main
In the screenshot above, you see a main ref and a origin/main ref for the same commit. The former identifies the of the local main branch while the latter identifies the tip of the main branch at the remote repo named origin. The fact that both refs point to the same commit means the local main branch and its remote counterpart are with each other.
Similarly, origin/HEAD ref appearing against the same commit indicates that of the remote repo is pointing to this commit as well.
5 Add a commit to the main branch. Let’s imagine it’s a bug fix.
To keep things simple for the time being, this commit should not involve the boxing.txt file that you changed in the feature1 branch. Of course, this is easily done, as the boxing.txt file you added in the feature1 branch is not even visible when you are in the main branch.
echo -e "Martina Navratilova" >> tennis.txt
git commit -am "Add Martina to tennis.txt"
gitGraph BT:
    %%{init: { 'theme': 'default', 'gitGraph': {'mainBranchName': 'main'}} }%%
    commit id: "m1"
    commit id: "m2"
    branch feature1
    commit id: "f1"
    commit id: "[feature1] f2"
    checkout main
    commit id: "[HEAD → main] m3"
    checkout feature1
6 Switch between the two branches and see how the working directory changes accordingly. That is, now you have two parallel timelines that you can freely switch between.
done!
You can also start a branch from an earlier commit, instead of the latest commit in the current branch. For that, simply check out the commit you wish to start from.
Preparation
Option 2: Continue with the sports repo from the previous hands-on practical
Scenario Suppose we want to create a branch containing an alternative version of the content we added in the feature1 branch.
Target Create a new branch that starts from the same commit the feature1 branch started from, as shown below:
gitGraph BT:
    %%{init: { 'theme': 'default', 'gitGraph': {'mainBranchName': 'main'}} }%%
    commit id: "m1"
    commit id: "m2"
    branch feature1
    branch feature1-alt
    checkout feature1
    commit id: "f1"
    commit id: "[feature1] f2"
    checkout main
    commit id: "[HEAD → main] m3"
    checkout feature1-alt
    commit id: "[HEAD → feature1-alt] a1"
Avoid this rookie mistake!
Always remember to switch back to the main branch before creating a new branch. If not, your new branch will be created on top of the current branch.
1 Switch to the main branch.
2 Checkout the commit at which the feature1 branch diverged from the main branch (e.g. git checkout HEAD~1). This will create
a 'detached' HEAD.
3 Create a new branch called feature1-alt and switch to it (e.g., git switch -c feature1-alt). The HEAD will now point to this new branch (i.e., no longer 'detached').
PRO-TIP: Creating a branch based on another branch in one shot
Suppose you are currently on branch b2 and you want to create a new branch b3 that starts from b1. Normally, you can do that in two steps:
git switch b1 # switch to the intended base branch first
git switch -c b3 # create the new branch and switch to it
This can be done in one shot using the git switch -c <new-branch> <base-branch> command:
git switch -c b3 b1
4 Add a commit on the new branch. Example:
echo -e "Venus Williams" >> tennis.txt
git commit -am "Add Venus to tennis.txt"
done!
Most work done in branches eventually gets merged together.
Merging combines the changes from one branch into another, bringing their diverged timelines back together.
When you merge, Git looks at the two branches and figures out how their histories have diverged since their merge base (i.e., the most recent common ancestor commit of two branches). It then applies the changes from the other branch onto your current branch, creating a new commit. The new commit created when merging is called a merge commit — it records the result of combining both sets of changes.
Given below is an illustration of how such a merge looks like in the revision graph:
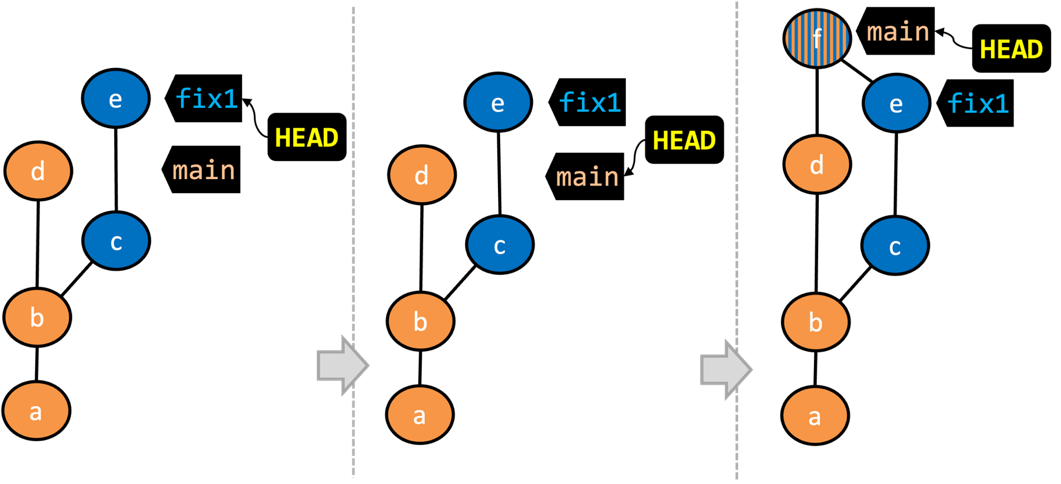
- We are on the
fix1branch (as indicated byHEAD). - We have switched to the
mainbranch (thus,HEADis now pointing tomainref). - The
fix1branch has been merged into themainbranch, creating a merge commitf. The repo is still on themainbranch.
The branch you are merging into (that is, the branch you are currently in when you do the merge operation) is called the destination branch (other terms: receiving branch, target branch)
The branch you are merging is referred to as the source branch (other terms: incoming branch, merge branch).
In the above example, main is the destination branch and fix1 is the source branch.
A merge commit has two parent commits e.g., in the above example, the merge commit f has both d and e as parent commits. The parent commit that is on the is considered the first parent and the parent commit on the is considered the second parent e.g., in the example above, fix1 branch is the source branch that is being merged into the destination branch main -- accordingly, d is the first parent and e is the second parent.
Scenario You have a repo with two unmerged branches main and feature1.
gitGraph BT:
    %%{init: { 'theme': 'default', 'gitGraph': {'mainBranchName': 'main'}} }%%
    commit id: "m1"
    commit id: "m2"
    branch feature1
    commit id: "f1"
    commit id: "[feature1] f2"
    checkout main
    commit id: "[HEAD → main] m3"
    checkout feature1
Target To practice branch merging, let's merge each branch to the other.
Preparation
1 Switch back to the feature1 branch.
gitGraph BT:
    %%{init: { 'theme': 'default', 'gitGraph': {'mainBranchName': 'main'}} }%%
    commit id: "m1"
    commit id: "m2"
    branch feature1
    commit id: "f1"
    commit id: "[HEAD → feature1] f2"
    checkout main
    commit id: "[main] m3"
    checkout feature1
2 Merge the main branch to the feature1 branch, giving an end-result like the following. Also note how Git has created a merge commit (shown as mc1 in the diagram below).
gitGraph BT:
    %%{init: { 'theme': 'default', 'gitGraph': {'mainBranchName': 'main'}} }%%
    commit id: "m1"
    commit id: "m2"
    branch feature1
    commit id: "f1"
    commit id: "f2"
    checkout main
    commit id: "[main] m3"
    checkout feature1
    merge main id: "[HEAD → feature1] mc1"
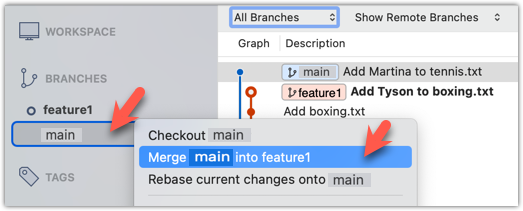
git merge main
Right-click on the main branch and choose merge main into the current branch. Click OK in the next dialog.
If a confirmation dialog pops up, choose as follows:
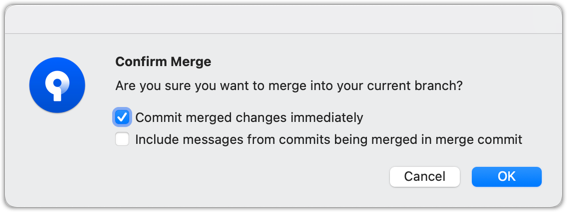
The revision graph should look like this now (colours and line alignment might vary but the graph structure should be the same):
Observe how the changes you made in the main branch (i.e., the imaginary bug fix in m3) is now available even when you are in the feature1 branch.
Furthermore, observe (e.g., git show HEAD) how the merge commit contains the sum of changes done in commits m3, f1, and f2.
3 Add another commit to the feature1 branch, in which you do some further changes to the boxing.txt.
echo -e "Manny Pacquiao" >> boxing.txt
git commit -am "Add Manny to boxing.txt"
Switch to the main branch and add one more commit.
git switch main
echo -e "Lionel Messi" >> football.txt
git commit -am "Add Messi to football.txt"
gitGraph BT:
    %%{init: { 'theme': 'default', 'gitGraph': {'mainBranchName': 'main'}} }%%
    commit id: "m1"
    commit id: "m2"
    branch feature1
    commit id: "f1"
    commit id: "f2"
    checkout main
    commit id: "m3"
    checkout feature1
    merge main id: "mc1"
    commit id: "[feature1] f3"
    checkout main
    commit id: "[HEAD → main] m4"
4 Merge feature1 to the main branch, giving an end-result like this:
gitGraph BT:
    %%{init: { 'theme': 'default', 'gitGraph': {'mainBranchName': 'main'}} }%%
    commit id: "m1"
    commit id: "m2"
    branch feature1
    commit id: "f1"
    commit id: "f2"
    checkout main
    commit id: "m3"
    checkout feature1
    merge main id: "mc1"
    commit id: "[feature1] f3"
    checkout main
    commit id: "m4"
    merge feature1 id: "[HEAD → main] mc2"
git merge feature1
Right-click on the feature1 branch and choose Merge.... The resulting revision graph should look like this:
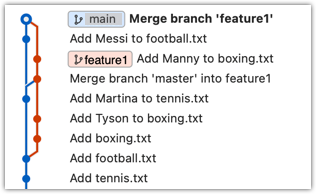
Now, any changes you made in feature1 branch are available in the main branch.
done!
When the destination branch hasn't diverged — meaning it hasn't had any new commits since the merge base commit — Git simply moves the branch pointer forward to include all the new commits in the source branch, keeping the history clean and linear. This is called a fast-forward merge because Git simply "fast-forwards" the branch pointer to the tip of the other branch. The result looks as if all the changes had been made directly on one branch, without any branching at all.
gitGraph BT:
    %%{init: { 'theme': 'default', 'gitGraph': {'mainBranchName': 'main'}} }%%
    commit id: "m1"
    commit id: "[HEAD → main] m2"
    branch bug-fix
    commit id: "b1"
    commit id: "[bug-fix] b2"
    checkout main
→
[merge bug-fix]
gitGraph BT:
    %%{init: { 'theme': 'default', 'gitGraph': {'mainBranchName': 'main'}} }%%
    commit id: "m1"
    commit id: "m2"
    commit id: "b1"
    commit id: "[HEAD → main][bug-fix] b2"
    checkout main
In the example above, the main branch has not changed since the merge base (i.e., m2). Hence, merging the branch bug-fix onto main can be done by fast-forwarding the main branch ref to the tip of the bug-fix branch (i.e., b2).
Scenario You have a repo with an unmerged branch add-swimming. The main branch has not diverged from the add-swimming branch yet.
gitGraph BT:
    %%{init: { 'theme': 'default', 'gitGraph': {'mainBranchName': 'main'}} }%%
    commit id: "more commits ..."
    commit id: "[main] mc2"
    branch add-swimming
    commit id: "a1"
    commit id: "[HEAD → add-swimming] a2"
Target Do a fast-forward merge of the add-swimming branch into the main branch.
Preparation
Target Do a fast-forward merge of the add-swimming branch.
1 Ensure you are on the main branch.
gitGraph BT:
    %%{init: { 'theme': 'default', 'gitGraph': {'mainBranchName': 'main'}} }%%
    commit id: "more commits ..."
    commit id: "[HEAD → main] mc2"
    branch add-swimming
    commit id: "a1"
    commit id: "add-swimming] a2"
2 Merge the add-swimming branch onto the main branch. Observe that there is no merge commit. The main branch ref (and the HEAD ref along with it) moved to the tip of the add-swimming branch (i.e., a2) and both branches now point to a2.
gitGraph BT:
    %%{init: { 'theme': 'default', 'gitGraph': {'mainBranchName': 'main (and add-swimming)'}} }%%
    commit id: "more commits ..."
    commit id: "mc2"
    commit id: "a1"
    commit id: "[HEAD → main][add-swimming] a2"
done!
It is possible to force Git to create a merge commit even if fast forwarding is possible. This is useful if you prefer the revision graph to visually show when each branch was merged to the main timeline.
To prevent Git from fast-forwarding, use the --no-ff switch when merging. Example:
git merge --no-ff add-swimming
Here are two other relevant options for the git merge command:
--ff-only: Merge goes ahead only if a fast-forward merge is possible.--ff: Explicitly specify a fast-forward merge is preferred, but allows creating a merge commit if a fast-forward merge is not possible. In fact, this is Git's default behaviour even if you don't use this option. So, the option is not useful unless the relevant default merge behaviour has been changed previously.
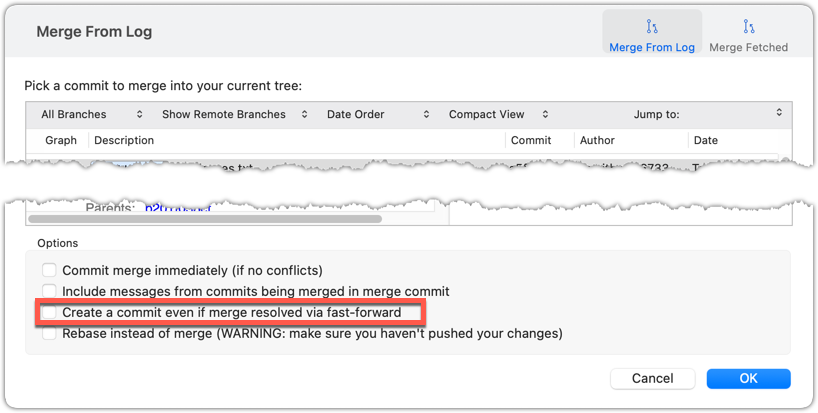
Tick the box shown below when you merge a branch:

Trigger the branch operation using the following menu button:

In the next dialog, tick the following option:
To permanently prevent fast-forwarding:
- Go to Sourcetree
Settings. - Navigate to the
Gitsection. - Tick the box
Do not fast-forward when merging, always create commit.
A squash merge takes all the changes from the source branch and combines them into a single commit on the destination branch. It is especially useful when the source branch has many small or experimental commits that would otherwise clutter history.
gitGraph BT:
    %%{init: { 'theme': 'default', 'gitGraph': {'mainBranchName': 'main'}} }%%
    commit id: "more commits ..."
    commit id: "[HEAD → main] m1"
    branch feature
    checkout feature
    commit id: "f1"
    commit id: "[feature] f2"
→
[squash merge...]
gitGraph BT:
    %%{init: { 'theme': 'default', 'gitGraph': {'mainBranchName': 'main'}} }%%
    commit id: "more commits ..."
    commit id: "m1"
    branch feature
    checkout feature
    commit id: "f1"
    commit id: "[feature] f2"
    checkout main
    commit id: "[HEAD → main] s1 (same as f1+f2)"
In the example above, the branch feature has been squash merged onto the main branch, creating a single 'squashed' commit s1 that combines all the commits in feature branch.
After a squash merge, you typically delete the source branch, so its individual commits are no longer kept. The destination branch's history stays linear, as the work done in the source branch is replaced by one commit on the destination branch. As a result, a squash merge commit is just a normal commit, and does not have a 'parent' reference to the source branch.
gitGraph BT:
    %%{init: { 'theme': 'default', 'gitGraph': {'mainBranchName': 'main'}} }%%
    commit id: "more commits ..."
    commit id: "[HEAD → main] m1"
    branch feature
    checkout feature
    commit id: "f1"
    commit id: "[feature] f2"
    checkout main
    merge feature
with a merge commit]
gitGraph BT:
    %%{init: { 'theme': 'default', 'gitGraph': {'mainBranchName': 'main'}} }%%
    commit id: "more commits ..."
    commit id: "m1"
    commit id: "f1"
    commit id: "[HEAD → main][feature] f2"
gitGraph BT:
    %%{init: { 'theme': 'default', 'gitGraph': {'mainBranchName': 'main'}} }%%
    commit id: "more commits ..."
    commit id: "m1"
    commit id: "[HEAD → main] s1 (same as f1+f2)"
deleting the source branch thereafter]
The mechanics of doing a squash merge is covered in a separate detour.
DETOUR: Undoing a Merge
- Ensure you are in the .
- Do a hard reset of that branch to the commit that would be the tip of that branch had you not done the offending merge i.e., rewind that branch to the state it was in before the merge.
In the example below, you merged main to feature1.
If you want to undo that merge,
- Ensure you are in the
feature1branch (because that's the destination branch). - Reset the
feature1branch to the commit that was the tip of thefeature1branch just before you merged themainbranch to it.
Branches can be renamed, for example, to fix a mistake in the branch name.
Local branches can be renamed easily. Renaming a branch simply changes the branch reference (i.e., the name used to identify the branch) — it is just a cosmetic change.
Target You wish to rename fantasy (not yet merged) and textbooks (merged), as shown below:
gitGraph BT:
    %%{init: { 'theme': 'default', 'gitGraph': {'mainBranchName': 'main'}} }%%
    commit id: "m1"
    branch textbooks
    checkout textbooks
    commit id: "[textbooks] t1"
    checkout main
    branch fantasy
    checkout fantasy
    commit id: "[fantasy] f1"
    checkout main
    merge textbooks id: "[HEAD → main] mc1"
→
[rename branches]
gitGraph BT:
    %%{init: { 'theme': 'default', 'gitGraph': {'mainBranchName': 'main'}} }%%
    commit id: "m1"
    branch study-books
    checkout study-books
    commit id: "[study-books] t1"
    checkout main
    branch fantasy-books
    checkout fantasy-books
    commit id: "[fantasy-books] f1"
    checkout main
    merge study-books id: "[HEAD → main] mc1"
Preparation
steps:
To rename a branch, use the git branch -m <current-name> <new-name> command (-m stands for 'move'):
git branch -m fantasy fantasy-books
git branch -m textbooks study-books
git log --oneline --decorate --graph --all # verify the changes
* 443132a (HEAD -> main) Merge branch textbooks
|\
| * 4969163 (study-books) Add textbooks.txt
|/
| * 0586ee1 (fantasy-books) Add fantasy.txt
|/
* 7f28f0e Add horror.txt
Note these additional switches to the log command:
--all: Shows all branches, not just the current branch.--graph: Shows a graph-like visualisation (notice how*is used to indicate a commit, and branches are indicated using vertical lines).
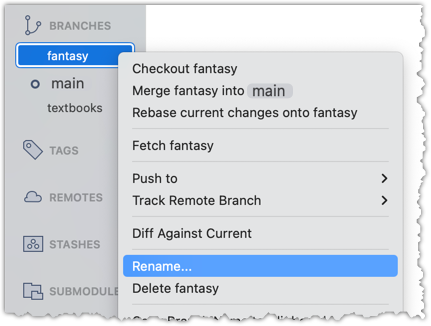
Right-click on the branch name and choose Rename.... Provide the new branch name in the next dialog.
done!
SIDEBAR: Branch naming conventions
Branch names can contain lowercase letters, numbers, /, dashes (-), underscores (_), and dots (.).
You can use uppercase letters too, but many teams avoid them for consistency.
A common branch naming convention is to prefix it with <category>/. Some examples:
feature/login-form— for new features (origin/feature/login-formcould be the matching remote-tracking branch)bugfix/profile-photo— for fixing bugshotfix/payment-crash— for urgent production fixesrelease/2.0— for prepping a releaseexperiment/ai-chatbot— for “just trying stuff”
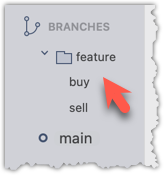
Although forward-slash (/) in the prefix doesn't mean folders, some tools treat it kind of like a path so you can group related branches when you run git branch. Shown below is an example of how Sourcetree groups branches with the same prefix.
Branches can be deleted to get rid of them when they are no longer needed.
Deleting a branch deletes the corresponding branch ref from the revision history (it does not delete any commits). The impact of the loss of the branch ref depends on whether the branch has been merged.
When you delete a branch that has been merged, the commits of the branch will still exist in the history and will be safe. Only the branch ref is lost.
gitGraph BT:
    %%{init: { 'theme': 'default', 'gitGraph': {'mainBranchName': 'main'}} }%%
    commit id: "m1"
    branch bug-fix
    checkout bug-fix
    commit id: "[bug-fix] b1"
    checkout main
    merge bug-fix id: "[HEAD → main] mc1"
→
[delete branch bug-fix]
gitGraph BT:
    %%{init: { 'theme': 'default', 'gitGraph': {'mainBranchName': 'main'}} }%%
    commit id: "m1"
    branch _
    checkout _
    commit id: "b1"
    checkout main
    merge _ id: "[HEAD → main] mc1"
In the above example, the only impact of the deletion is the loss of the branch ref bug-fix. All commits remain reachable (via the main branch), and there is no other impact on the revision history.
In fact, some prefer to delete the branch soon after merging it, to reduce branch references cluttering up the revision history.
When you delete a branch that has not been merged, the loss of the branch ref can render some commits unreachable (unless you know their commit IDs or they are reachable through other refs), putting them at risk of being lost eventually.
gitGraph BT:
    %%{init: { 'theme': 'default', 'gitGraph': {'mainBranchName': 'main'}} }%%
    commit id: "[HEAD → main] m1"
    branch bug-fix
    checkout bug-fix
    commit id: "[bug-fix] b1"
    checkout main
→
[delete branch bug-fix]
gitGraph BT:
    %%{init: { 'theme': 'default', 'gitGraph': {'mainBranchName': 'main'}} }%%
    commit id: "[HEAD → main] m1"
    branch _
    checkout _
    commit id: "b1"
    checkout main
In the above example, the commit b1 is no longer reachable, unless we know its commit ID (i.e., the SHA).
SIDEBAR: What makes a commit 'unreachable'?
Recall that a commit only has a pointer to its parent commit (not its descendent commits).
A commit is considered reachable if you can get to it by starting at a branch, tag, or other ref and walking backward through its parent commits. 'Reachable' is the normal state for commits — they are part of the visible history of a branch or tag.
If no branch, tag, or ref in the repo can be used as the starting point to reach a certain commit, that commit is unreachable. This often happens when you delete a branch or rewrite history (e.g., with reset or rebase), leaving some commits "orphaned" (or "dangling") without a ref pointing to them.
In the example below, C4 is unreachable (i.e., cannot be reached by starting at any of the three refs: v1.0 or main or ←HEAD), but the other three are all reachable.
Unreachable commits are not deleted immediately — Git keeps them for a while before cleaning them up. By default, Git retains unreachable commits for at least 30 days, during which they can still be recovered if you know their SHA. After that, they will be garbage-collected, and will be lost for good.
Scenario You have the following repo, named samplerepo-books-2.
gitGraph BT:
    %%{init: { 'theme': 'default', 'gitGraph': {'mainBranchName': 'main'}} }%%
    commit id: "m1"
    branch textbooks
    checkout textbooks
    commit id: "[textbooks] t1"
    checkout main
    branch fantasy
    checkout fantasy
    commit id: "[fantasy] f1"
    checkout main
    merge textbooks id: "[HEAD → main] mc1"
The work in the textbooks branch has been completed, and the branch has been merged -- there is no need to keep that branch anymore.
The work in the fantasy branch is no longer needed. Hence, there is no need for the branch either.
Target Delete the textbooks (merged) and fantasy branches (unmerged).
Preparation
1 Delete the (merged) textbooks branch.
Use the git branch -d <branch> command to delete a local branch 'safely' -- this command will fail if the branch has unmerged changes. In this case, it will succeed as the branch has no unmerged commits.
git branch -d textbooks
git log --oneline --decorate --graph --all # check the current revision graph
* 443132a (HEAD -> main) Merge branch textbooks
|\
| * 4969163 Add textbooks.txt
|/
| * 0586ee1 (fantasy) Add fantasy.txt
|/
* 7f28f0e Add horror.txt
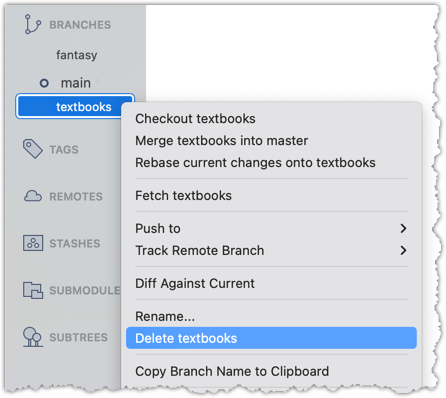
Right-click on the branch name and choose Delete <branch>:
In the next dialog, click OK:
Observe that all commits remain. The only missing thing is the textbook ref.
2 Make a copy of the SHA of the tip of the (unmerged) fantasy branch.
3 Delete the fantasy branch.
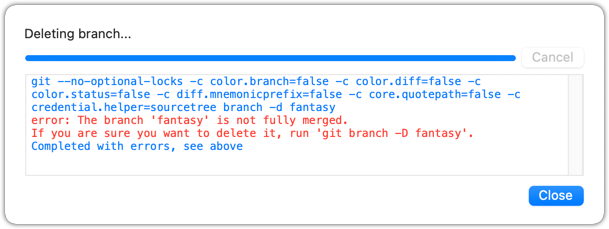
Attempt to delete the branch. It should fail, as shown below:
git branch -d fantasy
error: the branch 'fantasy' is not fully merged
hint: If you are sure you want to delete it, run 'git branch -D fantasy'
As also hinted by the error message, you can replace the -d with -D to 'force' the deletion.
git branch -D fantasy
Now, check the revision graph:
git log --oneline --decorate --graph --all
* 443132a (HEAD -> main) Merge branch textbooks
|\
| * 4969163 Add textbooks.txt
|/
* 7f28f0e Add horror.txt
Attempt to delete the branch as you did before. It will fail because the branch has unmerged commits.
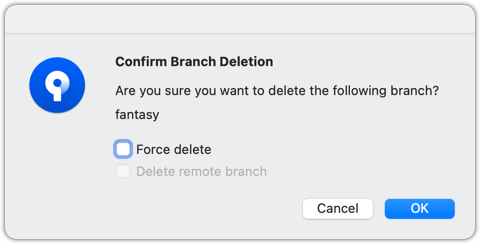
Try again but this time, tick the Force delete option, which will force Git to delete the unmerged branch:
Observe how the branch ref fantasy is gone, together with any unmerged commits on it.
4 Attempt to view the 'unreachable' commit whose SHA you noted in step 2.
e.g., git show 32b34fb (use the SHA you copied earlier)
Observe how the commit still exists and still is reachable using the commit ID, although it is not reachable by other means, and not visible in the revision graph.
done!
As this is the last lesson for this tour, this is a good time to attempt exercises that combine knowledge from multiple lessons in this tour:
At this point: Now you can create, maintain, and merge multiple parallel branches in a local repo. This tour covered only the basic use of Git branches. More advanced usage will be covered in other tours.
What's next: Tour 7: Keeping Branches in Sync